

Security
Security settings page let admins manage access and authentication for your Close organization.
Go to Settings > Organization > Security to manage:
- Trusted domains
- Company SSO
- Let people join without an invitation
- Restrict sign-ups to trusted domains only
- Enforce 2FA for password sign-in
- Close Support Access
Admin access required. You need admin access with permission to manage your organization to view or change these settings.
Security Overview
The table shows defaults, not necessarily your organization’s current settings. Existing domain and joining settings are retained. Check the status badges and toggles to see what is enabled.
Recommended setup order
If you are configuring security settings for the first time:
- Add and verify your organization’s email domain under Trusted domains.
- Configure Let people join without an invitation to choose your joining policy.
- Review Restrict sign-ups to trusted domains only to decide whether admins can invite people from other domains.
- Turn on Enforce 2FA for password sign-in, if needed.
- Review Close Support Access.
If your organization requires SSO for compliance or another business need:
- Set up and test SSO.
- Complete the test flow in the Company SSO configuration.
- Configure Login Requirements for the SSO connection.
Trusted domains
Trusted domains identify your organization’s verified email domains. They control who can find and join your organization on their own and help route members to Company SSO at sign-in.
The domain list shows Domain, Verified, and Allowed login methods. Use these login-method labels to check whether members on a domain can use a password, Company SSO, or both.
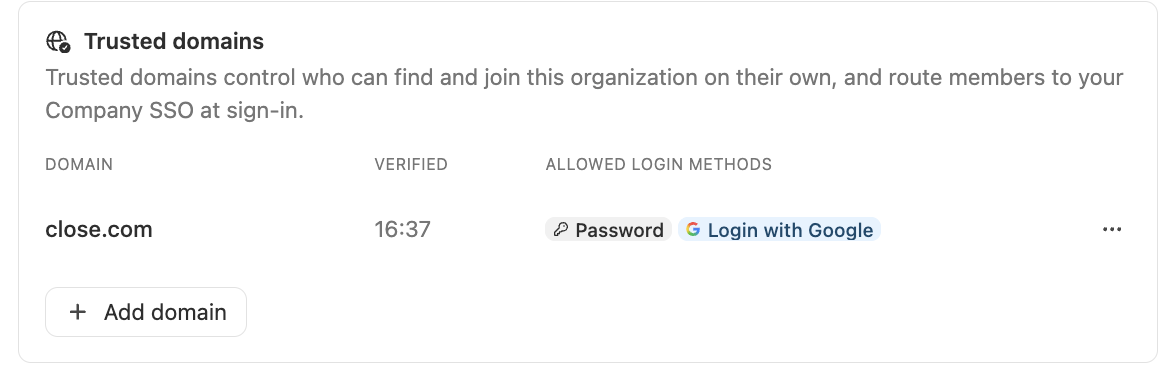
Add and verify a domain
- Go to Settings > Organization > Security.
- In Trusted domains, click Add domain and enter your domain.
- Close sends a verification email to your address on that domain.
- Open the email and follow the verification instructions.
- Return to Close and confirm that the domain is verified.
Members outside your trusted domains
The footer below the domain list shows how many existing members have emails outside your trusted domains and the login methods available to them, such as Password and Login with Google.
These members were invited before sign-ups were restricted to trusted domains, so they can still log in. Restricting new sign-ups does not remove existing members.
Review Login Requirements in your Company SSO configuration when checking authentication requirements. These requirements affect all domains.
Let people join without an invitation
This setting controls self-serve joining separately from your domain list and Company SSO. Only people with an email at a verified trusted domain can join this way.
To configure it:
- Go to Settings > Organization > Security.
- Find Let people join without an invitation and click Configure.
- In the modal, choose whether joining without an invitation is allowed and select the joining policy:
- Instantly: eligible people can join without waiting for admin approval.
- After approval: eligible people request to join and an admin must approve their request.
- If joining without an invitation is disabled, new members need an invitation.
- Review the default role for new members and save your changes.
Restrict sign-ups to trusted domains only
This is a separate switch that limits joining and invitations to trusted domains.
To change it:
- Go to Settings > Organization > Security.
- Find Restrict sign-ups to trusted domains only.
- Turn the switch on or off and follow any confirmation prompts.
- On: joining and invitations are limited to trusted domains.
- Off: admins can invite people from any domain. Self-serve joining still requires an email at a verified trusted domain.
Joining, sign-up restrictions, and authentication are separate decisions. The joining policy controls whether an eligible person needs an invitation or approval. The sign-up restriction controls which domains can be invited or join. Company SSO controls how members authenticate.
Company SSO
Company SSO lets members sign in through your organization’s identity provider. Admins configure the provider separately from joining and sign-up restrictions.
The Company SSO card shows the configured provider and its current status. Click Configure to open the SSO configuration modal and manage Login Requirements. These requirements apply at the SSO connection level and affect all domains.
Close supports:
- Google Workspace on all plans
- Okta and Microsoft Entra ID on Scale plans and equivalent legacy Business and Enterprise plans
One Company SSO connection per organization. You cannot configure both Okta and Google Workspace as Company SSO providers for the same organization.
Google sign-in with Google Workspace SSO. When Company SSO is configured for Google Workspace, Login with Google and Continue with Google SSO are the same sign-in method. This does not create a second Company SSO connection.
To set up SSO:
- Go to Settings > Organization > Security.
- In Company SSO, click Configure to open the modal.
- Choose your identity provider and enter the required configuration.
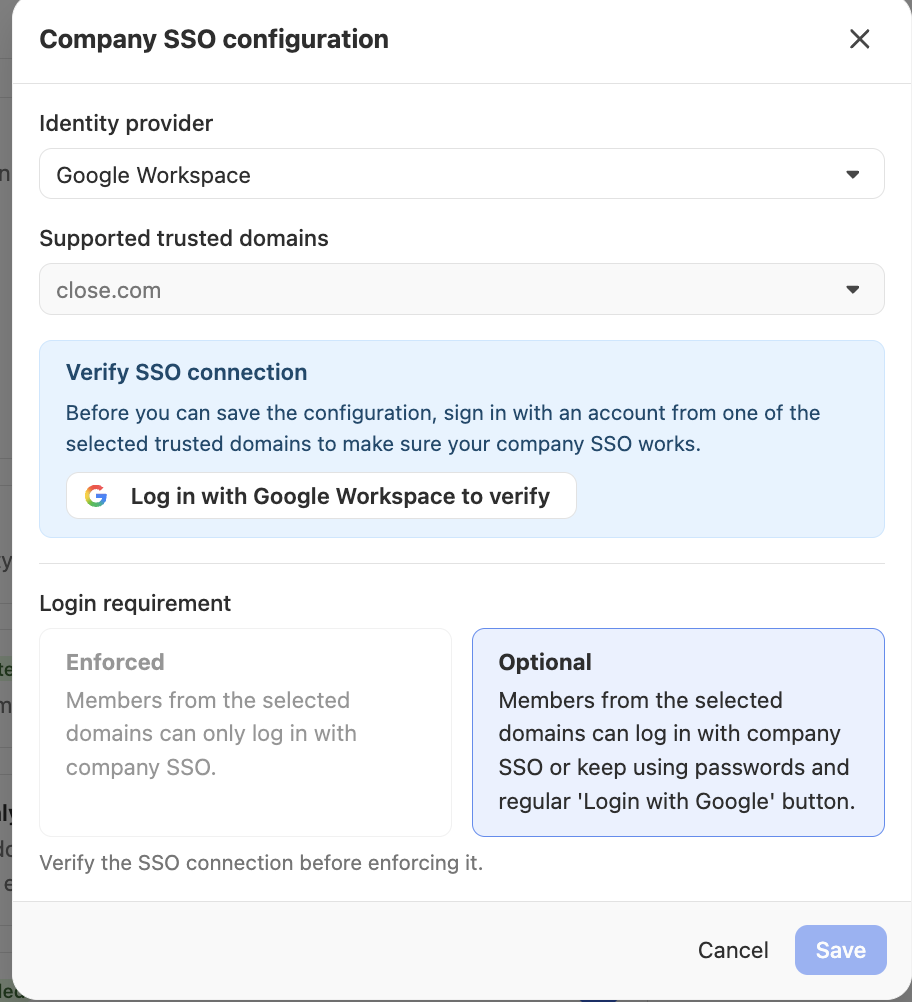
- Under Verify SSO connection, click the login button for your provider and sign in with an account from one of the selected trusted domains. You must verify the connection before you can save the configuration.
- Under Login requirement, choose Optional or, after verifying the connection, Enforced.
- Click Save.
Verify SSO connection before saving. The setup prompt asks you to sign in with an account from one of the selected trusted domains to make sure your Company SSO works. Complete this verification in the configuration modal before saving or enforcing SSO.
Google Workspace SSO
Google Workspace SSO uses Google sign-in and matches members by your verified domains.
Optional: Members can choose Google Workspace Company SSO or another allowed login method. Keep SSO optional while configuring and testing the connection.
Enforced: After completing Verify SSO connection, select Enforced under Login requirement to require Company SSO for members from the selected trusted domains.
Before setting up Google Workspace SSO:
- Make sure your Google Workspace domain is added as a verified trusted domain in Close.
- Make sure you are using a Google Workspace account, not a consumer Gmail account.
To set it up:
- Go to Settings > Organization > Security.
- In Company SSO, click Configure.
- Choose Google Workspace as your Identity provider.
- Select your Supported trusted domains.
- Under Verify SSO connection, click Log in with Google Workspace to verify and sign in with a Google Workspace account from one of the selected trusted domains.
- Choose Optional or Enforced under Login requirement.
- Click Save. You must verify the connection before saving or enforcing SSO.
Okta SSO
To use Okta, create an OIDC web app integration for Close in Okta.
- In Okta, create an OIDC web app integration for Close.
- Gather the Issuer URL, Client ID, and Client secret from Okta.
- In Close, go to Settings > Organization > Security.
- In Company SSO, click Configure to open the modal.
- Choose Okta and enter the Issuer URL, Client ID, and Client secret from Okta into the corresponding fields.
- If Okta asks for a callback or redirect URL, copy the Callback URL displayed in the Close configuration modal into Okta’s configuration.
- Select your Supported trusted domains.
- Under Verify SSO connection, click Log in with Okta to verify and sign in with an account from one of the selected trusted domains.
- Choose Optional or Enforced under Login requirement, then click Save. Verification is required before saving or enforcing SSO.
Microsoft Entra ID SSO
To use Microsoft Entra ID, create a custom Entra application for Close in Microsoft Entra.
- In Microsoft Entra, create a non-gallery web application for Close.
- Gather the Issuer URL, Client ID, and Client secret from Microsoft Entra ID.
- In Close, go to Settings > Organization > Security.
- In Company SSO, click Configure to open the modal.
- Choose Microsoft Entra ID and enter the Issuer URL, Client ID, and Client secret from your provider into the corresponding fields.
- If Microsoft Entra ID asks for a callback or redirect URL, copy the Callback URL displayed in the Close configuration modal into your provider’s configuration.
- Select your Supported trusted domains.
- Under Verify SSO connection, use the provider’s login button and sign in with an account from one of the selected trusted domains.
- Choose Optional or Enforced under Login requirement, then click Save. Verification is required before saving or enforcing SSO.
Login requirement
Manage the Login requirement in the Company SSO configuration, after verifying the SSO connection. The setting applies at the SSO connection level, rather than being configured separately for each domain.
To manage it:
- Go to Settings > Organization > Security.
- In Company SSO, click Configure.
- Select your Supported trusted domains and complete the Verify SSO connection prompt by signing in with an account from one of those domains.
- Under Login requirement, select Optional or Enforced. The connection must be verified before you can enforce SSO.
- Click Save.
- Optional: Members from the selected domains can use Company SSO or passwords or regular “Log in with Google” option
- Enforced: Members from the selected domains can only sign in with Company SSO.
When Company SSO is enforced for the selected domains, members from those domains must authenticate through the configured identity provider to access the organization. API keys and OAuth tokens continue working.
Sign in with SSO
When members sign in to Close, they enter their email first. Close checks whether the email matches an organization with SSO.
What members see depends on the organization’s SSO settings:
- If SSO is not configured, members continue with the usual password or Google sign-in options.
- If Company SSO is optional, members can choose Company SSO or use passwords or regular “Log in with Google” option.
- If Company SSO is required by the organization’s Login requirement, the member must continue with the organization’s configured SSO provider to access that organization.
When Company SSO is configured for Google Workspace, Login with Google and Continue with Google SSO are the same sign-in method.
A password option does not bypass required SSO. If you belong to multiple organizations and at least one allows password sign-in, the login screen will offer both password and Company SSO.
Close checks access for each organization separately. You must authenticate through the required Company SSO provider before accessing or switching to an organization that requires SSO. When SSO authentication is required, Close automatically tries to sign you in through that method.
First-time SSO email confirmation
The first time you sign in through an organization’s Okta or Microsoft Entra ID SSO provider as an existing Close user, Close sends a one-time confirmation email before linking your SSO identity and creating the session. This check can appear even if your email address is already verified.
Open the email and confirm the SSO sign-in to continue. Later sign-ins with the same linked SSO identity do not require this confirmation.
Troubleshooting SSO
A member can’t access the organization
Check Login requirement in the Company SSO configuration, along with the member’s Allowed login methods in Trusted domains.
- If Company SSO is required, the member must sign in through the configured identity provider.
- If Company SSO is optional, the member can use any allowed login method.
- Review the selected Supported trusted domains and the login methods available to the member.
Also confirm that the member exists in your identity provider and has access to the Close application.
The identity provider is unavailable
If your identity provider is unavailable, members required to use SSO may not be able to access the organization.
An admin who still has access can open the Company SSO configuration and change Login requirement to make SSO optional, whether or not the SSO connection is verified.
If that does not restore access, or no admin can access the organization, contact Close Support for recovery options.
Enforce 2FA for password sign-in
Two-factor authentication adds an extra verification step when members sign in with a password. Admins can require app-based two-factor authentication for their organization.
This setting applies to password sign-ins.
Require 2FA for your organization
To require two-factor authentication:
- Go to Settings > Organization > Security.
- Find Enforce 2FA for password sign-in.
- Turn on the switch.
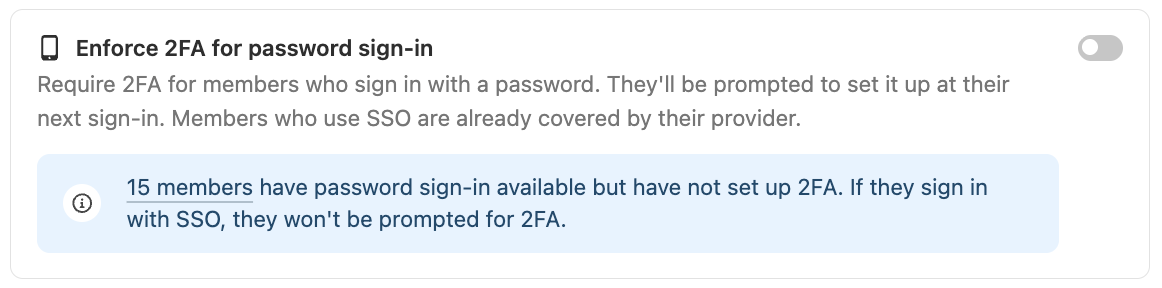
The card also shows how many members have password sign-in available but have not set up 2FA. When this setting is ON, members who sign in with a password and have not set up 2FA must configure 2FA before they can access the organization.
Two-factor authentication is tied to the user account, not only one organization. Once a member sets it up, they can use it for password sign-ins across Close
Set up or reset two-factor authentication
See Enabling two-factor authentication for step-by-step instructions to set up 2FA and guidance on how admins can reset a member’s 2FA.
Close Support Access
Close Support Access controls whether Close can log in as members of your organization to troubleshoot support issues.
This setting is on by default. If you turn it off, Close staff can no longer log in as members of your organization.
Change Close Support Access
To manage this setting:
- Go to Settings > Organization > Security.
- Find Close Support Access.
- Turn the switch on or off.
What happens when Support Access is off
When Support Access is off:
- Close staff cannot log in as members of your organization.
- Any active support session ends on the next action, navigation, or refresh.
- Future support requests may require additional verification or escalation.
Support requests may take longer. Turning off Close Support Access may make some support requests take longer to resolve.
Email verification
Email verification is not toggle on the Security settings page. It is a separate account requirement, not an organization setting that admins can turn on or off.
See Verify your email address for instructions on verifying your Close account’s email address.
Close requires users to verify their email address before using certain actions. This helps protect your account and reduces abuse from unverified or throwaway accounts.
If your email is not verified, Close prompts you to verify it. Check your inbox for the verification email from Close and click the link.
After your email is verified, you can continue using Close normally.
If a user has not verified their email, they can still sign in and view existing data, but attempts to create, update, or delete data are blocked in the app and through the API.
Your data is not deleted. Verify the email address to restore full access