Lead Scoring
Whether your business is growing or you work with a high volume of leads, lead scoring will help you address the most important leads quickly and prioritize the rest. Check out our Ultimate Guide to Lead Scoring here on the Close blog for an even more in-depth look at how to score leads, regardless of the CRM you’re using. For learning about lead scoring in Close, fear not—you’re still in the right place. In this article, we’ll walk you through lead scoring in Close by using Custom Fields, Custom Activities, and Smart View filtering.
Step 1: Find your ideal customer
The way we score our leads at Close will likely differ from how you want to score yours. The first step in understanding which leads you should prioritize is to find your ideal customer. We wrote a full post and created this template for you if you don’t already have an ideal customer.
Step 2: Determine your ideal customer criteria
Compile a list of criteria that your ideal customers have in common. Here are some examples:
- Company size
- Industry
- Location
- Job title
- Source
- Funding or financial situation
- They opted-in for an event or a newsletter, or they filled out a form on your website
- They signed up for a trial
- They came from a specific ad
Step 3: Track criteria in Close
Track the criteria from Step 2 using Custom Fields, Custom Activities, or any other Close data points.
You might need to add new Custom Fields to your Close setup.
If you need to bulk update or add Custom Fields for hundreds or thousands of leads, we recommend these options:
- If you can easily find the leads you need to update using another data point such as a lead status, an address in a given area, an Opportunity, etc., use Search to filter the leads you need and bulk update the Custom Field by clicking the three dots at the top-right corner of your list, choose Bulk Edit, then Update a Custom Field. Select the Custom Field and value you want to add.


-
If you can’t easily search and filter the leads you want to update, export your leads as a CSV and add one column per Custom Field. When you re-import your leads, make sure you check for duplicates to add the new value in that column to your existing leads rather than creating brand-new duplicate leads.
-
Make sure you are using the right Custom Field types for each individual piece of data. Examples:
- Company size could be a multiple choice if you store it as a range or a number if you want to create a range using Smart Views.
- Industry could be a multiple choice.
- Job title could be a multiple choice.
- Source could be a multiple choice.
- Funding could be a number.
- Even opt-in, trial signup, or ad source could be a multiple choice.
Lead enrichment third-party tools
Bring important criteria into Close from external tools such as LeadFuze, Clearbit, Lusha, and ZoomInfo. Automate lead enrichment with most of these tools using Zapier, a native integration, or our open API.
- LeadFuze: Native integration
- Clearbit: Zapier
- Lusha: Zapier
- ZoomInfo: CSV (spreadsheet)
Step 4: Create Smart Views
Use the criteria you’ve stored in Close to create a Smart View for each score or prioritization level. Here are some examples.
-
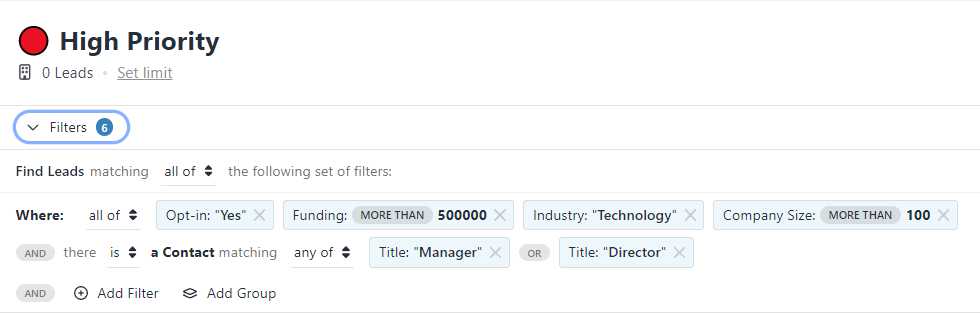
High-Priority Leads:
- Company size: 100+ employees
- Industry: Technology
- Job title: Manager or Director
- Funding: $500,000+
- They have an opt-in or signed up for a trial
-
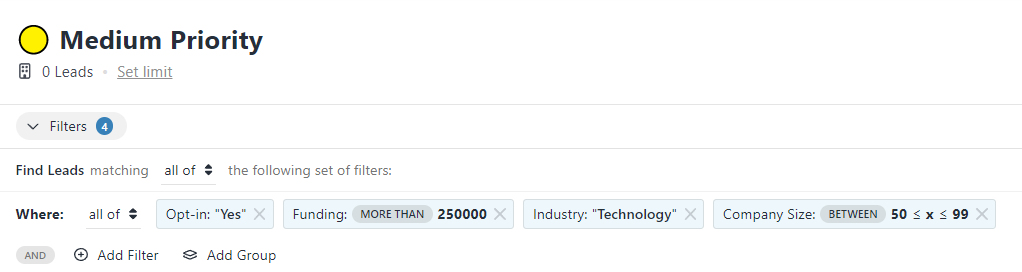
Medium Priority Leads:
- Company size: 50-99 employees
- Industry: Technology
- Funding: $250,000+
- They have an opt-in
-
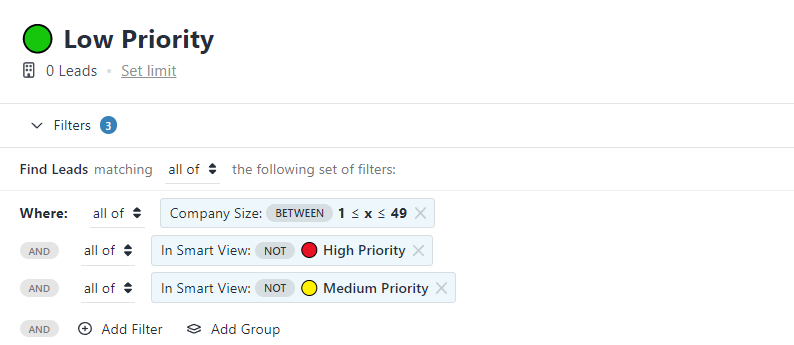
Low Priority Leads:
- Company size: 1-49 employees
- It doesn’t show up in High or Medium Priority Leads Smart View
After you create these Smart Views, access them from your left sidebar. Get into a daily or weekly routine checking these Smart Views; your next opportunity could show up.
Step 5: What’s next?
Once you’ve scored and prioritized your leads, you can use these lists in a multitude of scenarios. Here are a few examples:
- Lead assignment: You can assign higher priority leads to senior reps or keep low priority leads for onboarding reps.
- Task prioritization: Your sales reps can use these lists to prioritize their day. For example, if you use the “Lead Owner” Custom Field to assign leads to your reps, they can add “custom.lead owner” in (“Me”) to any of the above Smart Views to see their high, medium, and low priority leads.
- Processes and workflows: If your follow-up processes differ depending on a lead score or priority, use your new scoring lists to set up a Workflow for your reps and automate your sales process.