Plan limits
Workflows are only available on the Growth and Scale plans.
Workflows can be used to automate tasks and outreach. There are endless possibilities of what you can automate, but the most common use cases are:
Automatically update Leads when an Opportunity is won.
Randomly assign a new Lead to a team member and automate a scheduled sequence of email, SMS, task, and/or call tasks to the assigned team member.
Create an Opportunity when a Custom Activity is published and dynamically insert data from the Custom Activity in the Opportunity.
Workflows can be triggered manually on Leads and Contacts or automatically based on a wide variety of events that occur in Close. The Workflow will continue to run until all of the Steps have been completed or until a Workflow Goal is met.
Workflow Glossary
Workflows in Close are designed to help you automate repetitive tasks, stay organized, and save your team time. Each Workflow is made up of several components:
Triggers — This defines when and how your Workflow will start and which CRM object (Leads, Contacts, Opportunities, etc) will be the subject. A Workflow can be triggered manually on a Lead or Contact or triggered automatically based on a specific event that occurs in Close.
Steps — These are the individual actions that take place within the Workflow. This includes sending email or SMS, updating Leads, or creating and assigning Tasks.
Runs — Each instance or execution of a Workflow is referred to as a “run”. You can view all of the instances, or runs, of a Workflow using the Runs view.
Artifacts — The fields emitted by a Workflow's Trigger, Steps, and related Objects (Lead associated with the Trigger, Workflow Recipient, etc.) as a Run is processed. Artifacts are made available in the artifact menu so they can be referenced on later Steps.
Workflow Goals — Events that occur while a Run is active that can automatically stop the Run from continuing (ex: An incoming email is received, a meeting is scheduled, or the Lead Status changes).
Recipient — The designated Contact that any communication steps (email, SMS, or Call Task) will be sent to.
Communication Steps — Email, SMS, and Call steps in a Workflow. These steps involve additional settings that should be reviewed to ensure they are executed successfully.
Communication Window — The days and times when a communication step (email, SMS, or Call Task) can be sent.
Run Once — When enabled, a Workflow will only run on a specific Contact one time. This is designed to prevent a Contact from receiving the same communication multiple times.
Run Multiple — When enabled, a Workflow will run every time it is triggered.
Owner — The user that created the Workflow (or was assigned a Workflow when a user was removed).
Create a Workflow
You can create a Workflow or manage an existing Workflow by clicking Workflows on the left-hand sidebar of Close. You can create a new Workflow by duplicating an existing Workflow by clicking the More icon (three dots) and selecting “Duplicate” on any Workflow.
Newly created Workflows begin in a Draft state and require a name, trigger, and at least one step in order to be activated.
Selecting a Trigger
Every Workflow requires a trigger event in order to initiate an instance, or Run. A Workflow can be triggered manually on a Lead or Contact or triggered automatically when any of the following events occur:
Lead event
Custom Activity event
Opportunity event
Contact event
Call event
Meeting Activity event
Form submission event
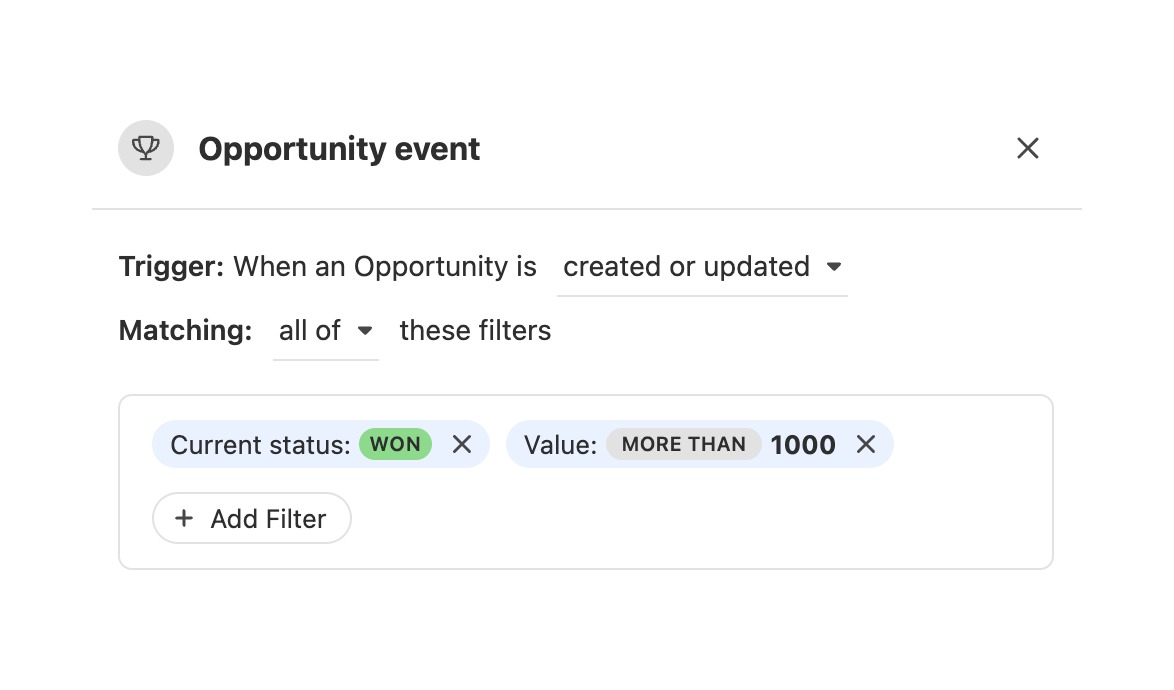
Automated triggers can be configured to only trigger when certain criteria are met. For example, the below Workflow will only trigger when an Opportunity is created or updated, the Opportunity Status is “Won” and the Opportunity value is more than 1,000:
Adding Steps
Every Workflow requires at least one Step. Steps can automate things like:
Updating a Lead based on a specific event that occurs
Send emails or SMS messages to a Contact
Create and assign a Task to a user
Create a new Opportunity
To add a new step to a Workflow, click on the “Add Step” icon in the Workflow “Edit” tab and choose a Step from the list. To remove a Step, click on the specific Step in the Editor and click the Trash icon at the bottom left of the Step editor pane.
Learn more details about each individual Workflow Step here.
Adding a delay between Steps
A minute, hour, or day delay can be added to each Step in the Workflow. You can delay a Workflow step from 1 minute up to 365 days. Delays include weekends (Saturday and Sunday).
To add a delay, click on a step and select “Add delay” at the top and configure the desired delay:
Delays on Email, SMS, or Call steps
When a delay is set on a communication step (email, SMS, or call), the communication may not be sent immediately once the delay ends. The exact timing of when a communication step is sent is based on the Workflow’s Communication Window and daily sending limits.
Choosing a Recipient for communication steps
If your Workflow contains communication steps (email, SMS, or call), a “Recipient” Contact is required. The choices you have for a Recipient are based on the Workflow trigger.
You can select the Recipient by clicking on “Recipient & Schedule” on the top right of the Workflow editor and choose an option from the “Recipient for all communication steps” dropdown:

If the field is empty or the selected Recipient is not available when the Workflow runs, the Primary Contact on the Lead will be the Recipient.
Archiving or Deleting Workflows
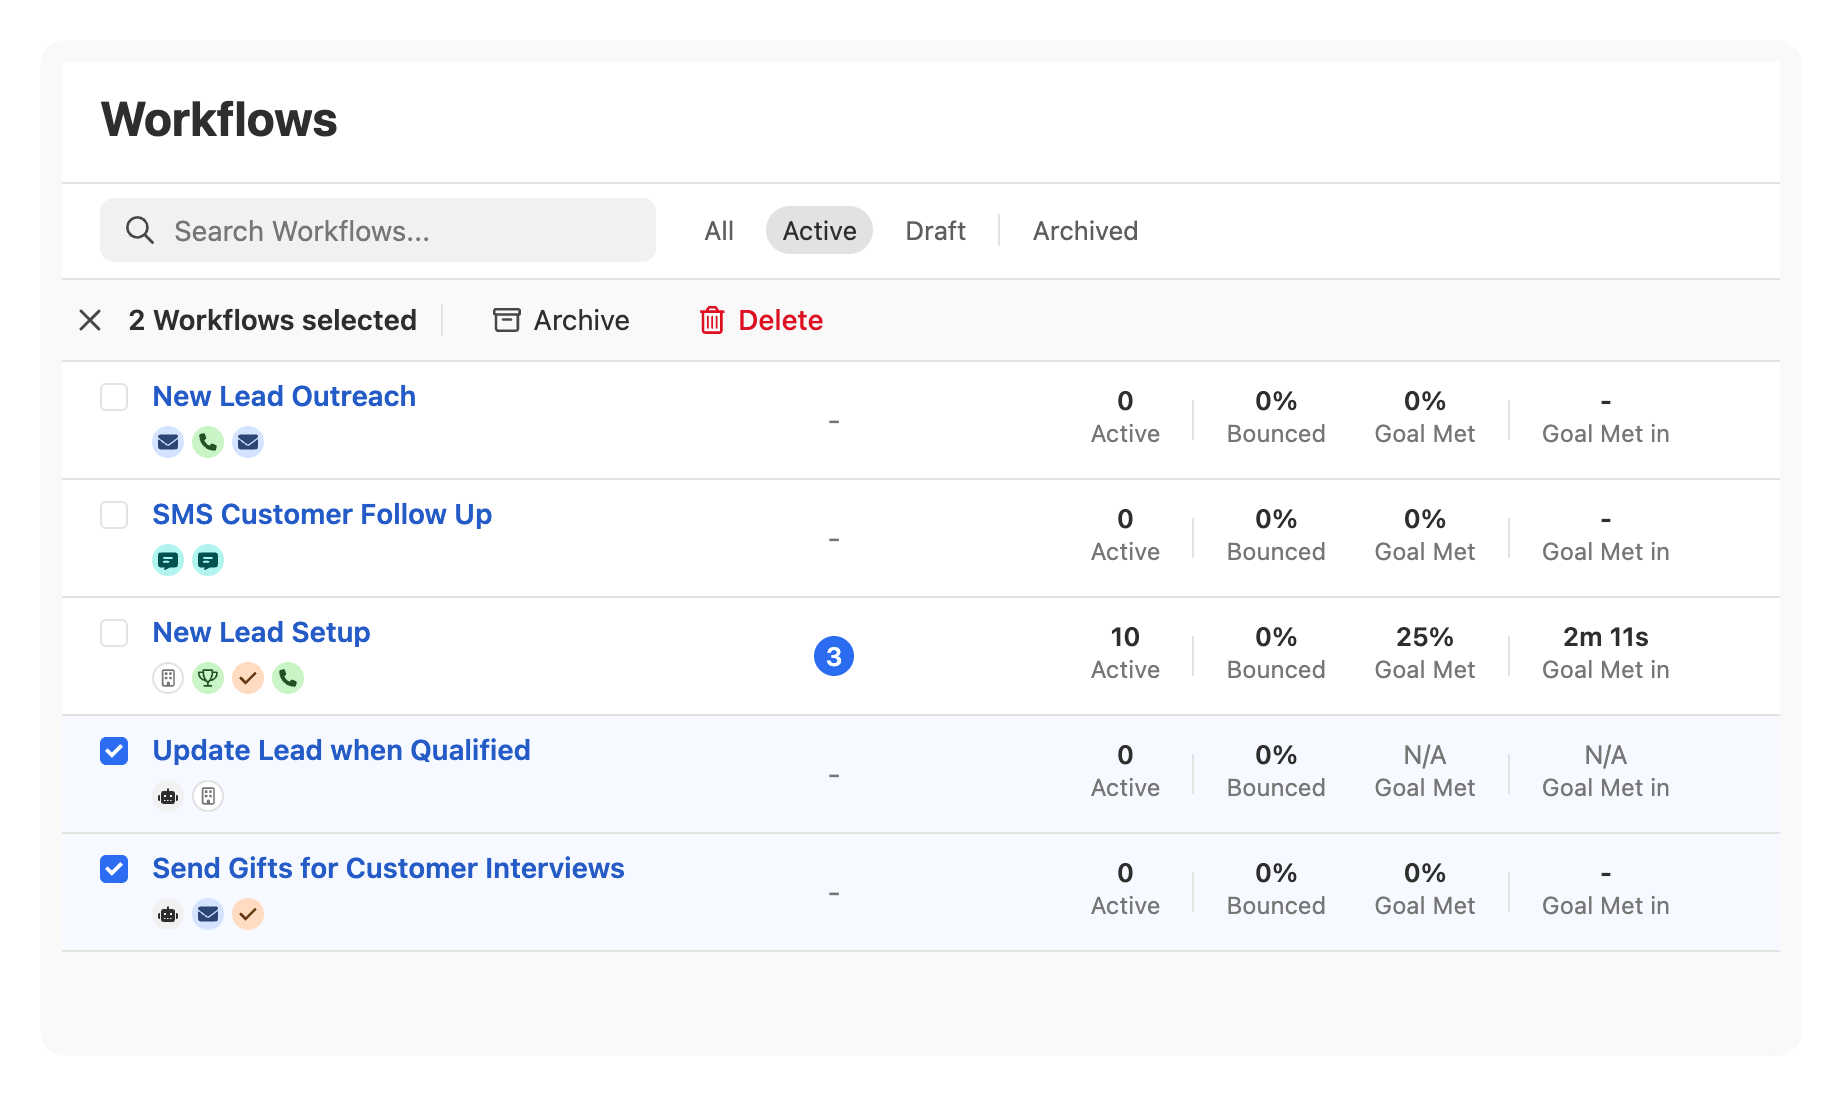
You can archive or delete Workflows by selecting one or more Workflows from the Workflow list and select “Archive” or “Delete”.
When a Workflow is archived, all active Runs are paused and no more steps will be executed. When an archived Workflow is reactivated, the paused Runs will immediately “fast forward” to the next step without any delay. Subsequent steps will honor any set delay.
Archiving a Workflow can be useful in situations where you need to immediately stop all activity from that Workflow for some period of time. Then once you are ready for things to resume, you can reactivate it in a single click.
Workflow Goals
Setting Workflow Goals
Workflow Goals can automatically pause a Workflow Run when qualifying events occur while the Run is active. When there is a Recipient contact on a Workflow, the incoming email, SMS, call and meeting booked goals will be enabled by default.
If any of the enabled goals occur while the Run is active, the Run will be paused and set to “Goal Met” automatically. This will also mark the Recipient contact as “Converted” in Workflow reporting.
You can configure the Workflow Goals by clicking on the “Workflow Goals” button on the top left of the Workflow Editor:
Here are all of the current supported Workflow Goals and their requirements:
Workflow Goal | Requirements |
|---|---|
Incoming email | Recipient contact |
Incoming SMS | Recipient contact |
Incoming call | Recipient contact |
Meeting booked | Recipient contact, Calendar syncing |
Lead Status change | |
Outcome met | Recipient contact |
You can pause the workflow subscription at any time; however, the Workflow will be marked with Paused status and will not count towards the Goal Met percentage on the Workflows page.
Workflow Goals in Reporting
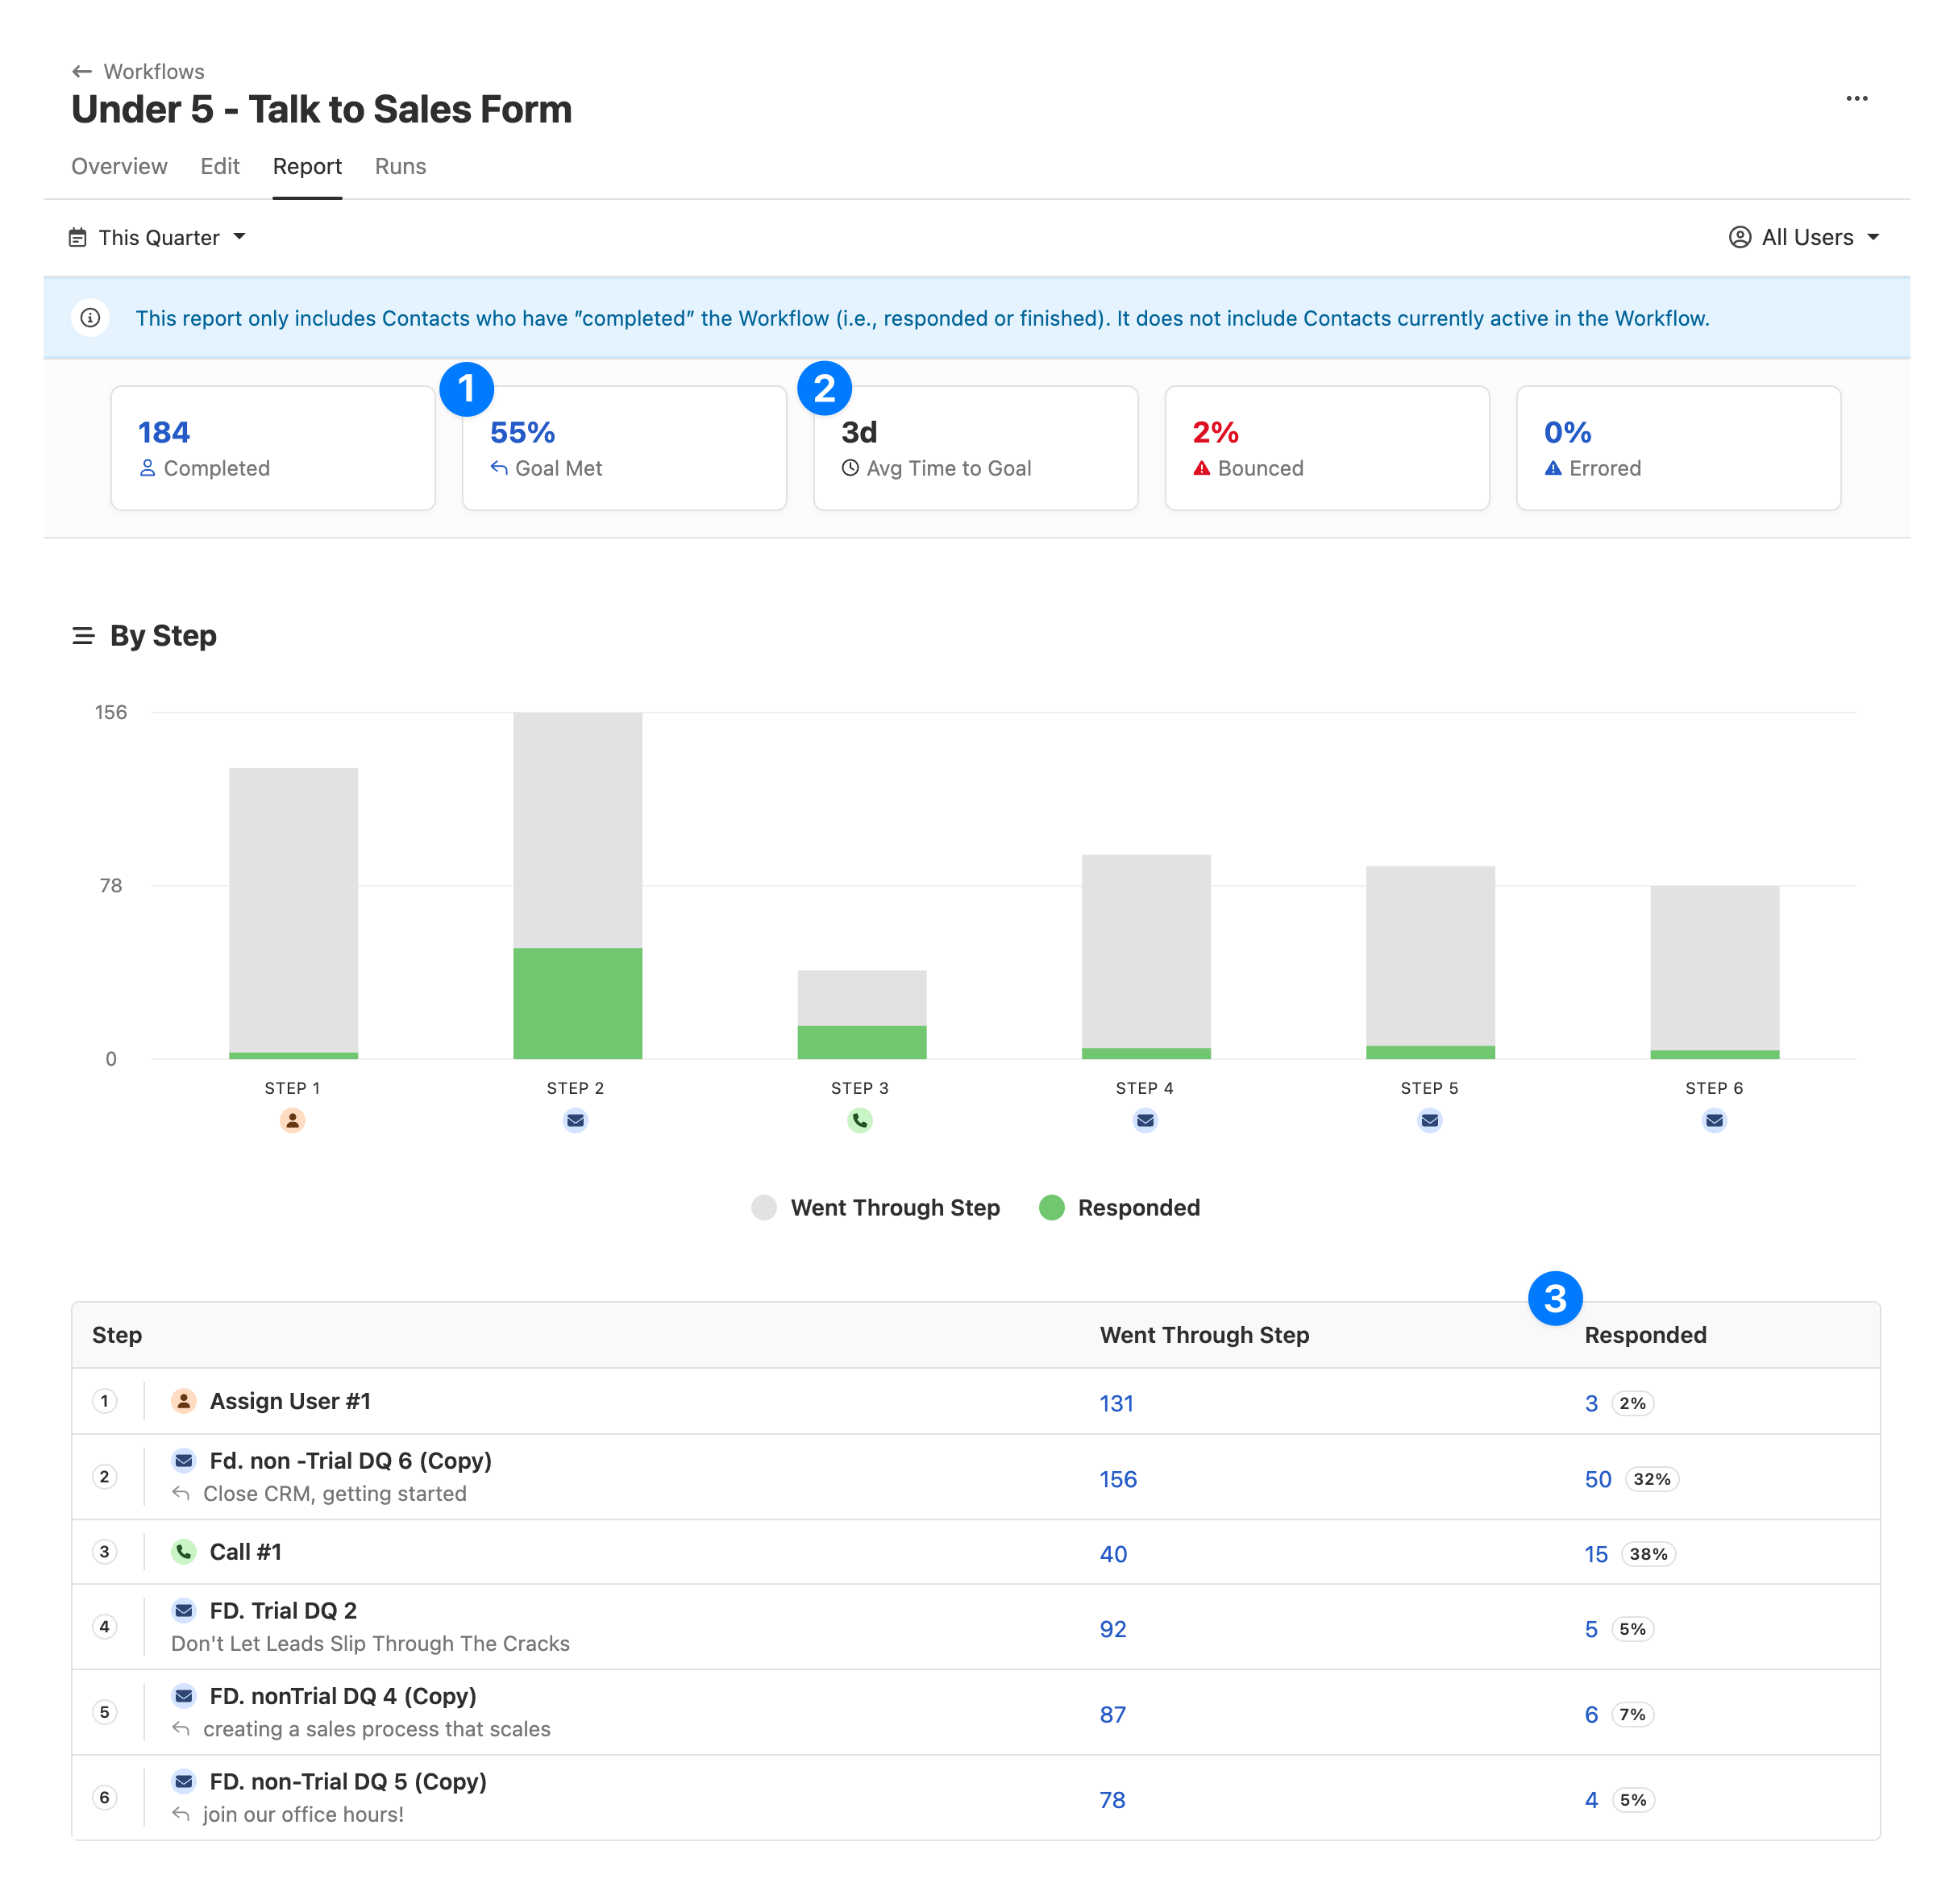
On the “Report” tab of a Workflow, there are three metrics based off the Workflow Goals:
Goal Met (%) — The percentage of Recipient contacts that have reached the “Goal Met” status in comparison to all of the Recipient contacts who have completed the Workflow.
Avg Time To Goal (days) — The average number of days it takes a Recipient contact to reach a Workflow Goal.
Responded by Step — For each Workflow step, the number and percentage of Recipient contacts that reached a Workflow Goal after the step was completed.
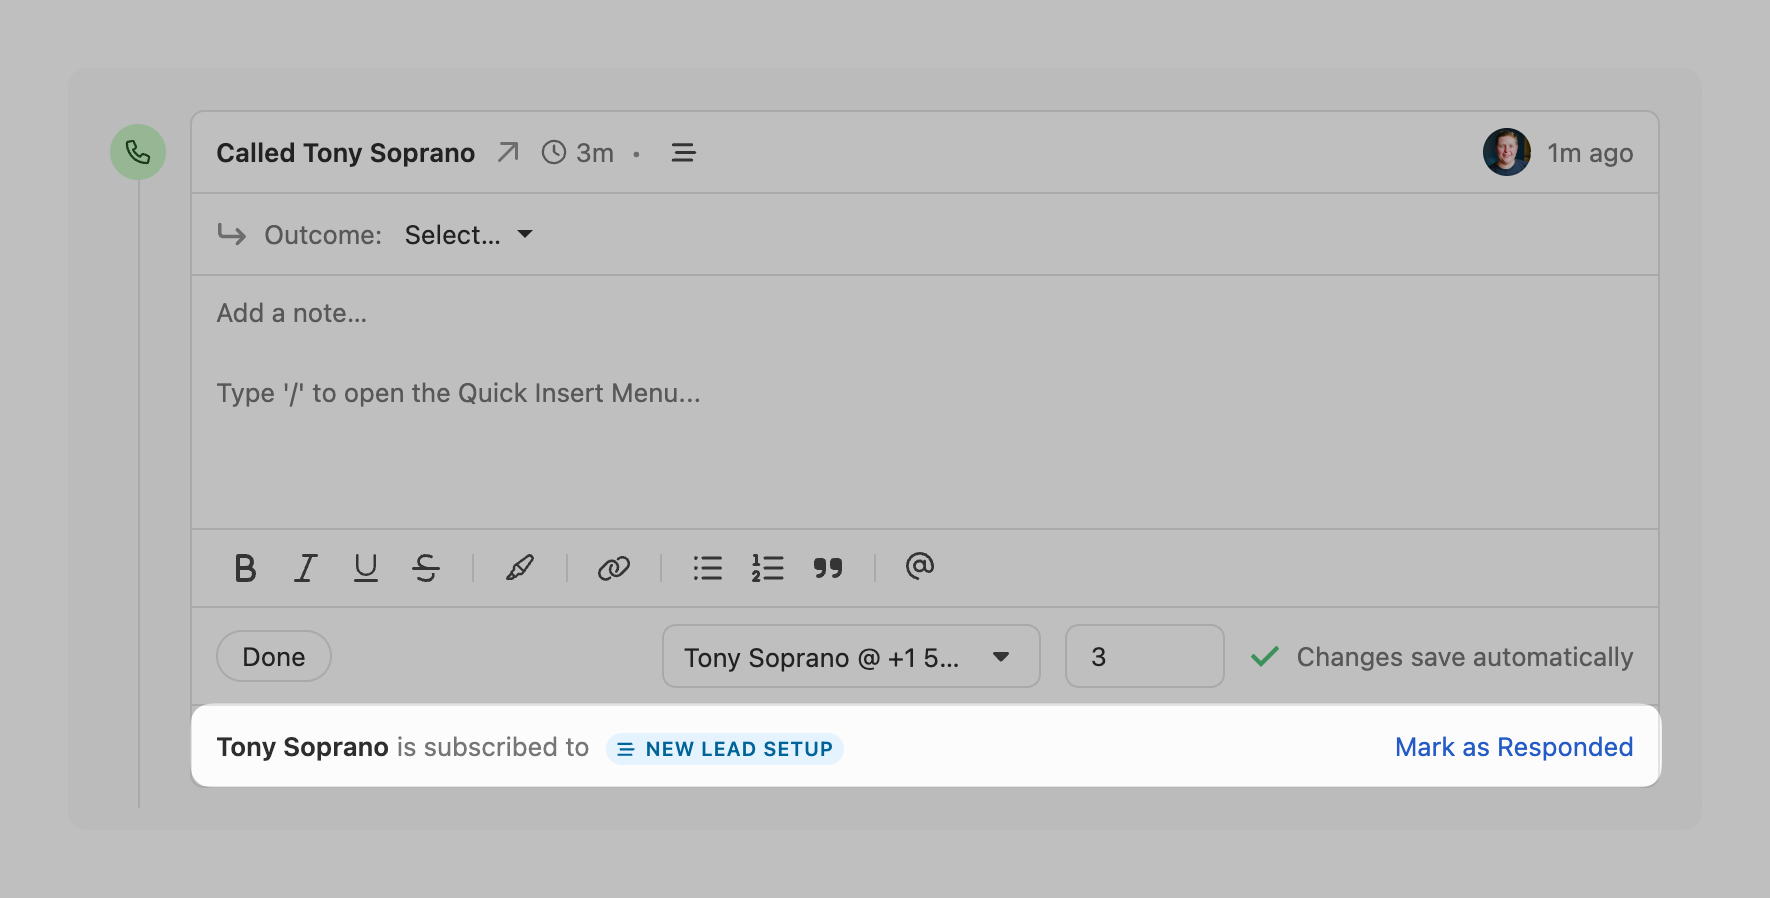
Manually setting a Recipient to “Goal Met” on Call Tasks
There may be a situation when you are trying to complete a Call Task to a Recipient but you are unable to establish a call (invalid number, no phone number, etc).
When there is a pending Call Task on an active Workflow Run, you can manually set the Run status to “Goal Met” and count the Recipient contact as converted by manually logging a call and clicking “Mark as Responded”:
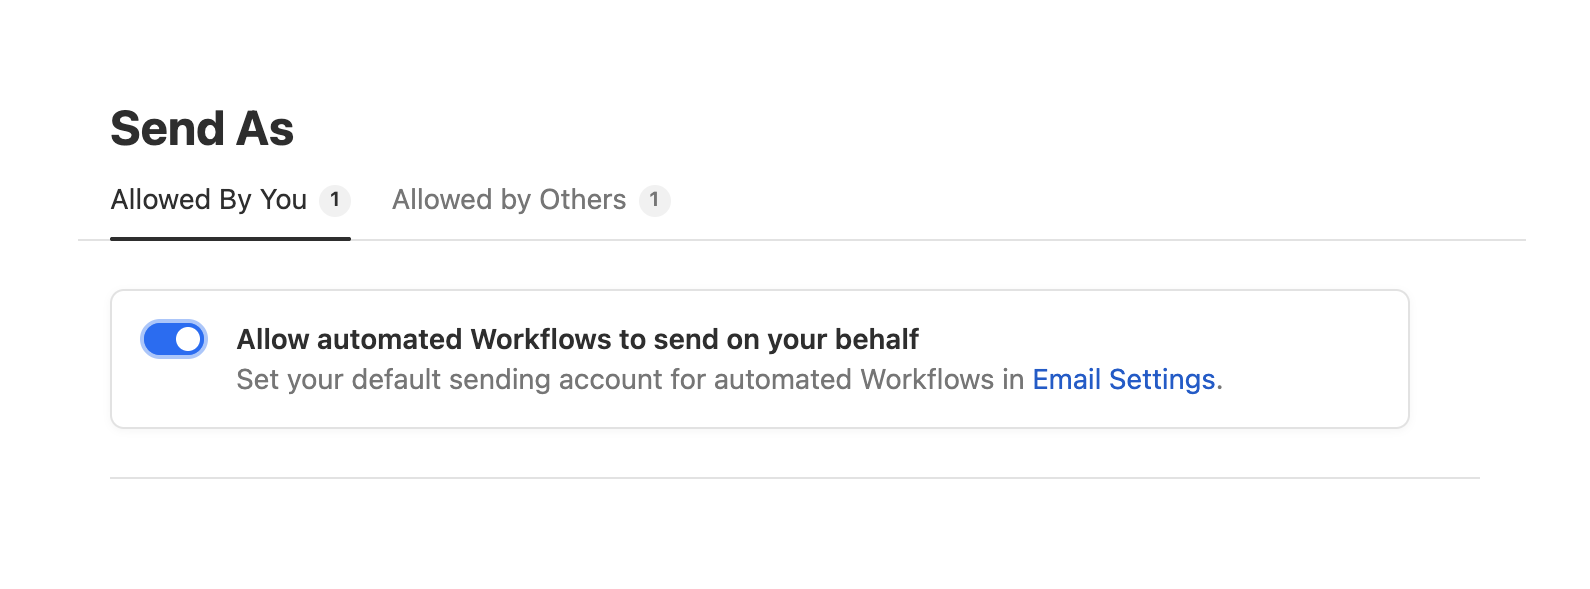
Sending communication on a user’s behalf via Workflows
Workflows can be used to send email and SMS messages on a user’s behalf. In order for any Workflow step to send an email or SMS on a user’s behalf, **they must have “Allow automated Workflows to send on your behalf” enabled in Settings > Send As**:
Users can select the default account that should be used for Email steps by going to Settings > Email. SMS steps try to match the best SMS enabled phone number that the user has access to.
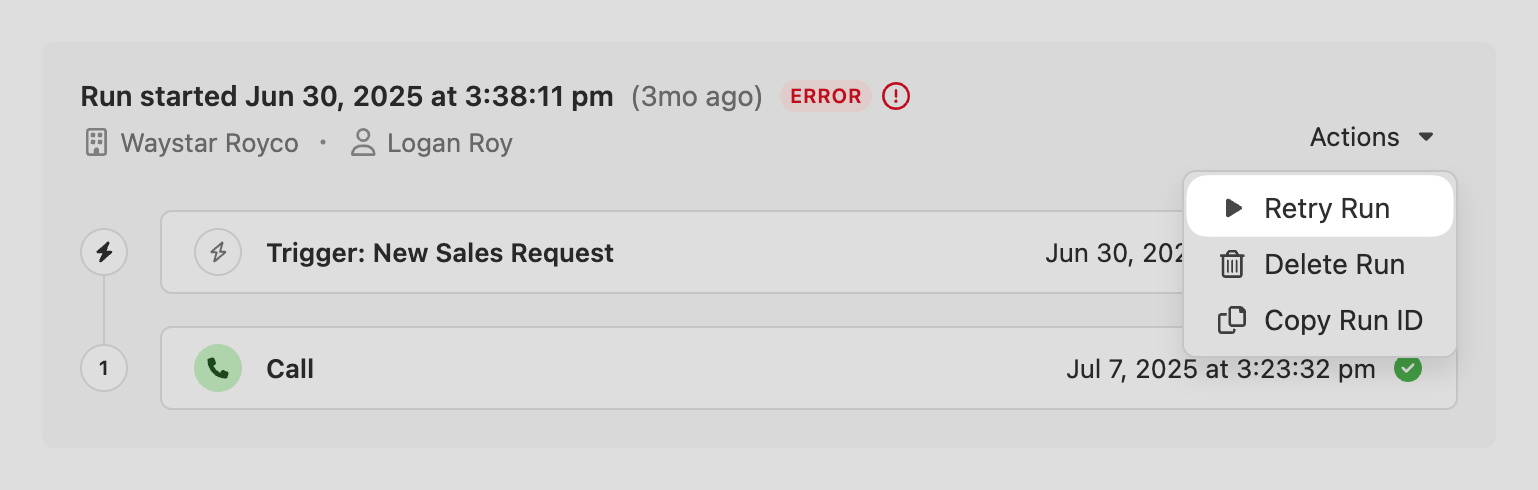
If an Email or SMS step is assigned to a user that does not have this setting enabled, the Workflow Run will be set to an “Error” state:
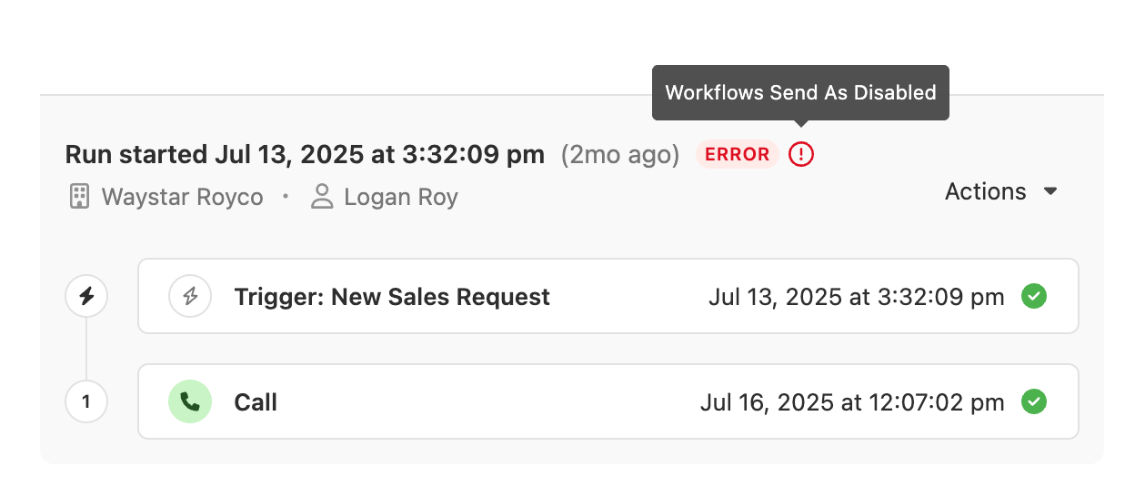
If you have an errored Run and the assigned user has since enabled the “Allow automated Workflows” setting, you can go to the Run and attempt to retry it by selecting “Retry Run” from the Run Actions menu:
To see which users in your organization have this setting enabled or disabled, go to Settings > Team Management and look for the check icon in the “Send As” column.
Recipient Communication Options (Run Once vs Run Multiple)
When you want to prevent a Workflow from being triggered on the same Contact multiple times, set the Workflow to “Run Once” on the Recipient tab within the Recipient & Schedule settings:

When a communication step is added to a Workflow, “Run Once” is selected by default. If you want the Workflow to run every time it is triggered, select “Run Multiple”. All Workflows that do not contain communication steps are set to “Run Multiple” by default.
At this time, Workflows without communication steps (email, call, or SMS) cannot be set to “Run Multiple”.
Communication Windows
When a Workflow contains communication steps (email, SMS, or call), a communication schedule is applied to ensure that any outgoing communication mimics human behavior.
By default, any Workflow with an email or SMS message step will be sent Monday through Friday at a random time between 9AM - 4PM using the Contact’s timezone (local timezone or Estimated local timezone).
If Local time is set by a user, this takes priority over the Estimated local time.
If Estimated local time (based on their address or phone number) is what is available, then this takes next precedence.
If the Contact’s time zone is not available, a “Fallback Timezone” is used.
Learn more:
To adjust a Workflow’s Communication Window, click on “Recipient & Schedule” at the top right of the Workflow editor:
Communication Windows and Communication Step Delays
The length of your step delay will determine the window, or "block", for when your next communication step will be performed. For example, if the first step in a Workflow is performed at 9:32 AM and there is a 1-hour delay set on the next communication step:
The time for the next step will be computed as 10:32 AM (9:32 AM + 1 hour).
This places the step into the 10:00 to 11:00 AM "block" or communication window.
Therefore, the step will performed between 10:32 AM and 11:00 AM.
For longer delays between steps (24+ hours), the window covers the entire day according to the communication schedule. For example, if the communication schedule for a Workflow is Monday to Friday from 9:00 AM to 4:00 PM, and the first step is performed at 9:32 AM on a Monday with a 1-day delay set for the next step, the next step will be performed as follows:
The time for the next step will be computed as Tuesday at 9:32 AM (Monday at 9:32 AM + 24 hours).
Since Tuesday at 9:32 AM is within the communication schedule, the "block" will be adapted.
The next step will performed between 9:32 AM - 4:00 PM on Tuesday.
Timezones
When possible, Close will use the Recipient Contact’s local timezone; if this is not available, it will use the Estimated local timezone. The system will only use the Fallback Timezone if the timezone cannot be determined.
A Contact’s Estimated local timezone is defined by:
If the Contact has a single phone number, we calculate their timezone based on the country code & area code of that number.
If the Contact has multiple phone numbers, the system will consider all phone numbers available to determine a “middle timezone”, between all timezones available.
Override a Contact's Time Zone Manually
If needed, you can manually override a contact's time zone. When a manual time zone is set, it takes precedence over any time zone inferred from the contact's phone numbers. This is useful when a contact's phone number no longer reflects their current location. You can also clear the override at any time to revert to the estimated time zone.
A Note on toll-free phone numbers
If the Contact only has US or Canadian toll-free phone numbers, Close will not be able to correctly define the timezone since toll-free numbers are not location-specific (i.e. they could be in any US/Canadian timezone).
Blackout Dates
Create calendars and assign them to Workflows to prevent email and SMS messages from being sent on certain days (holidays, vacations, etc).
A Workflow can have one or multiple Blackout Date calendars applied. Once added, any dates on the calendar(s) will be factored into the Workflow's Communication Window.
Please note:
Blackout Dates only prevent automated email and SMS steps from being processed. All other Workflow steps and email or SMS messages created as drafts will ignore Blackout Dates.
A user must have the "Manage Workflows" permission to manage and apply Blackout Date calendars.
If you add the current date to a Blackout Date calendar and trigger a Workflow Run on the same day, any automated email or SMS steps set to run on the same day will still be processed because the day is already in progress.
Creating a Blackout Date calendar
To create a Blackout Date calendar, go to Settings > Blackout Dates in your organization settings and click "New Calendar"
Name your calendar (ex: "Company Holidays" or "Nick's Schedule")
Begin adding dates or date ranges in the future by clicking "Add Dates".
If you'd like a date or date range to repeat each year, check "Repeat each year" (ex: New Year's Day).
We recommend naming each date so you and the team have context on why that date or date range is included.
If you'd like this calendar to be automatically added to any newly created Workflows, make sure "Auto-select (add to all new Workflows)" is enabled.
Once configured, click "Save".
Add or remove a Blackout Date calendar to a Workflow
To add a Blackout Date calendar to a Workflow, go to the Workflow editor and click on the "Recipient and Schedule" button. Click the "Schedule" tab and select one or multiple Blackout Date calendars:
Once saved, the selected calendar(s) will be applied to the Communication Window for all future email and SMS steps.
Update the Blackout Date calendars for multiple Workflows
If you need to add Blackout Date calendars to multiple Workflows at once, select the Workflows from the Workflows List and select "Set Blackout Dates". Select the Blackout Date calendar(s) you'd like to apply to the selected Workflows and click "Apply":
Note: Any Blackout Date calendar changes you make in bulk will only add new Calendars to the Workflow(s). Existing calendars will remain as is.
Triggering a Workflow outside of its Communication Window
If a Workflow is triggered outside of the Communication Window, any initial email or SMS step will be sent at a random time on the first day or hour of the sending window (depending on whether the step delay is less than 24 hours or not).
For example, if the Communication Window is 9am - 4pm, Weekdays with a 1-day delay and the Workflow is triggered on a Saturday, the Recipient contact will receive the first email in the flow at a random time the following Monday.
Email sending limits and Workflows
Email steps in Workflows are subject to your overall Email Sending Limits. Other email activity may cause email steps in Workflows to be further delayed.
Triggering Workflows manually
Workflows can be triggered manually on Leads or Contacts. In order for a Workflow to be triggered manually, the trigger on the Workflow must have one of the following configurations:
Trigger manually > Select a Trigger Object > Leads
Trigger manually > Select a Trigger Object > Contacts
Lead event > “Allow this Workflow to be triggered manually” is enabled
Contact event > “Allow this Workflow to be triggered manually” is enabled
Triggering a Workflow on an individual Lead or Contact
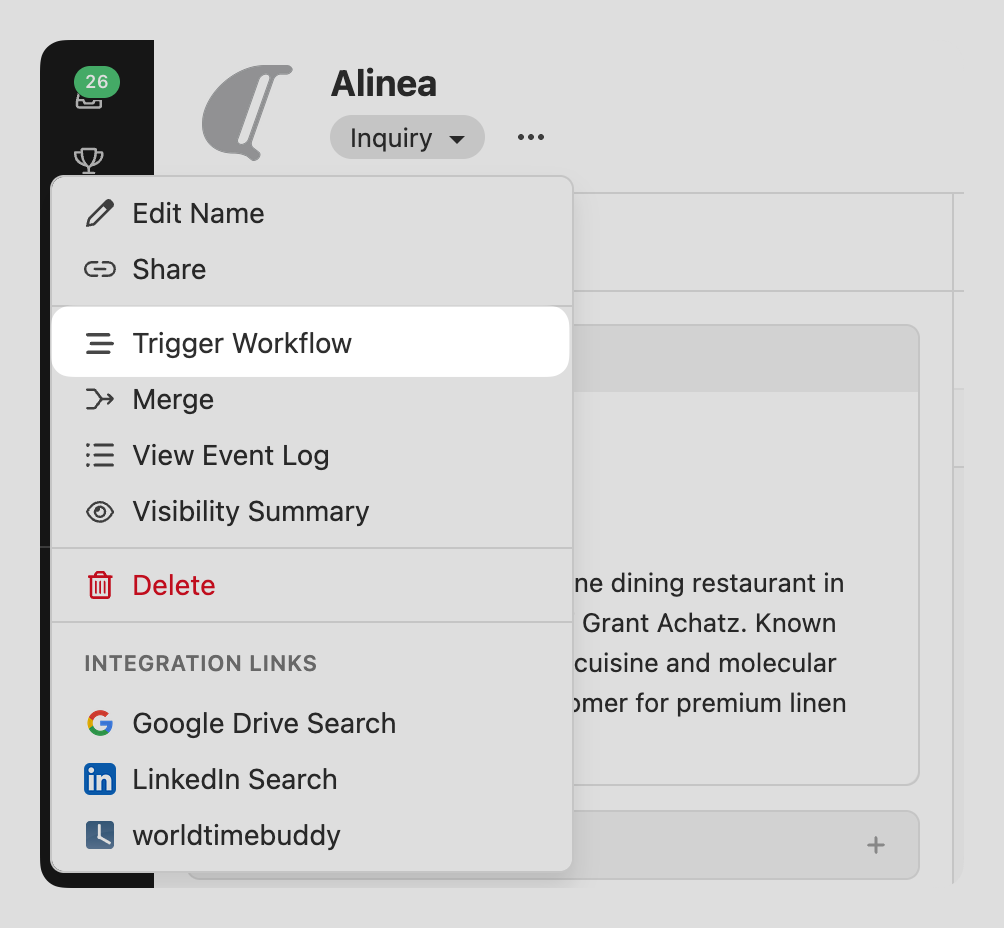
To trigger a Workflow manually on an individual Lead, navigate to the desired Lead and click on the Manage Lead icon (three dots) next to the Lead Status:
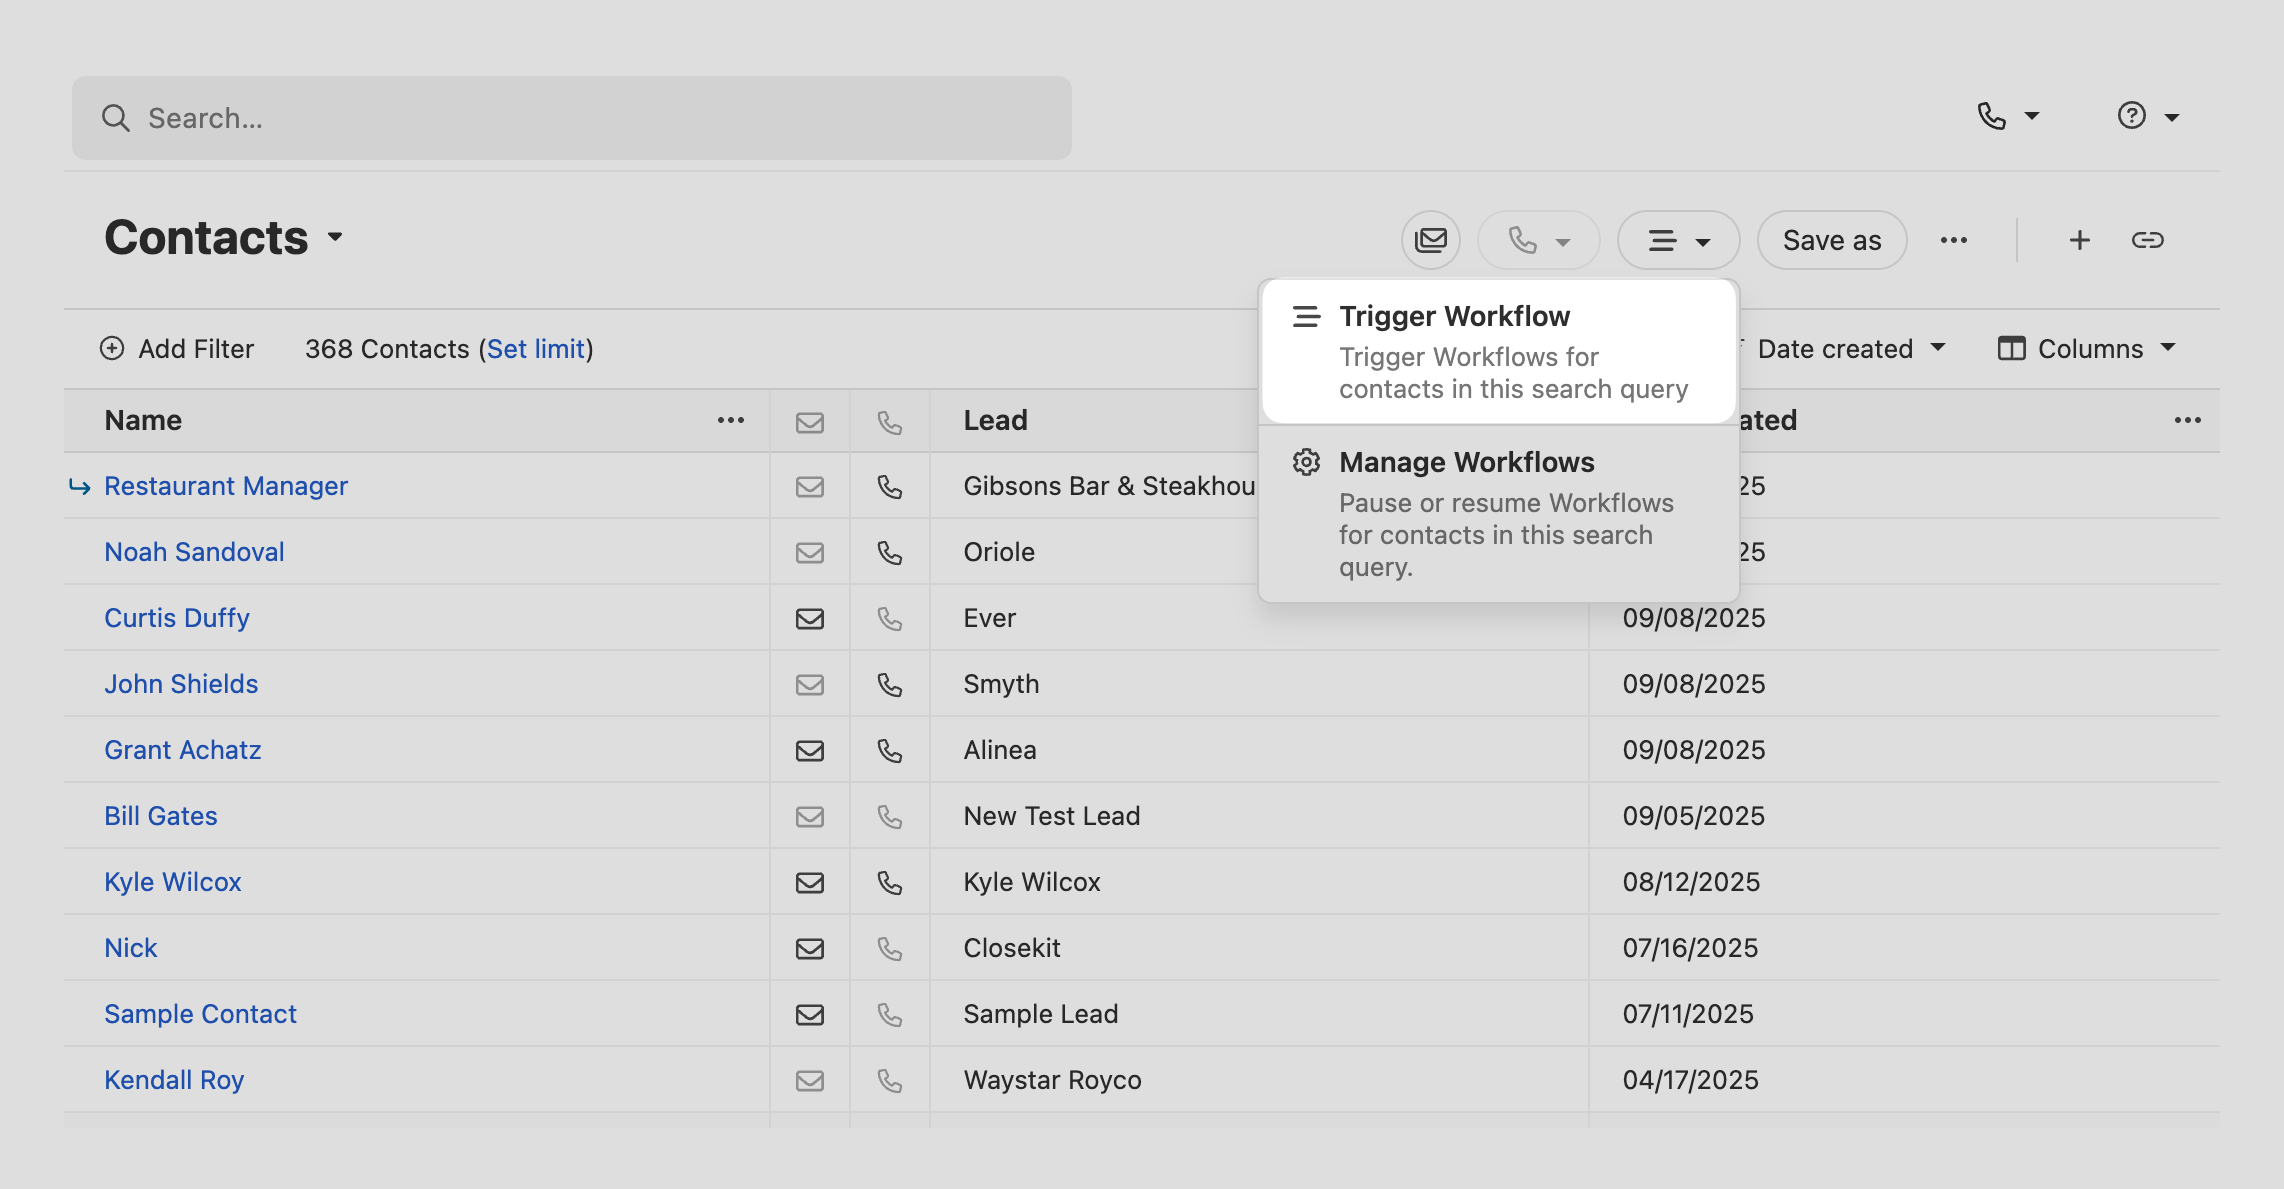
To trigger a Workflow on an individual Contact, navigate to the desired Contact in the Lead view, click on the More icon (three dots), and select “Trigger Workflow”.
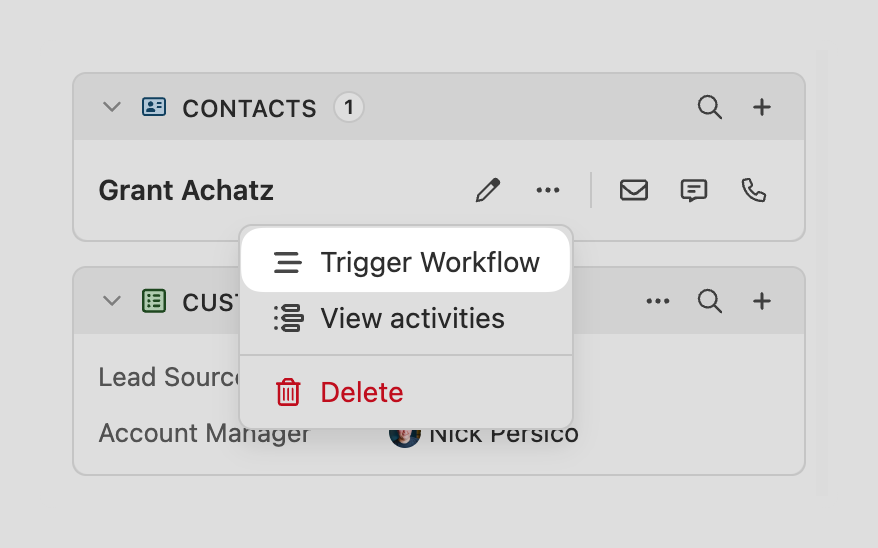
Contacts that have existing Workflow runs will show a “Manage Workflows” option that includes information about existing Workflow Runs and provide a way to trigger a new Workflow run.
Triggering a Workflow on Leads or Contacts in bulk
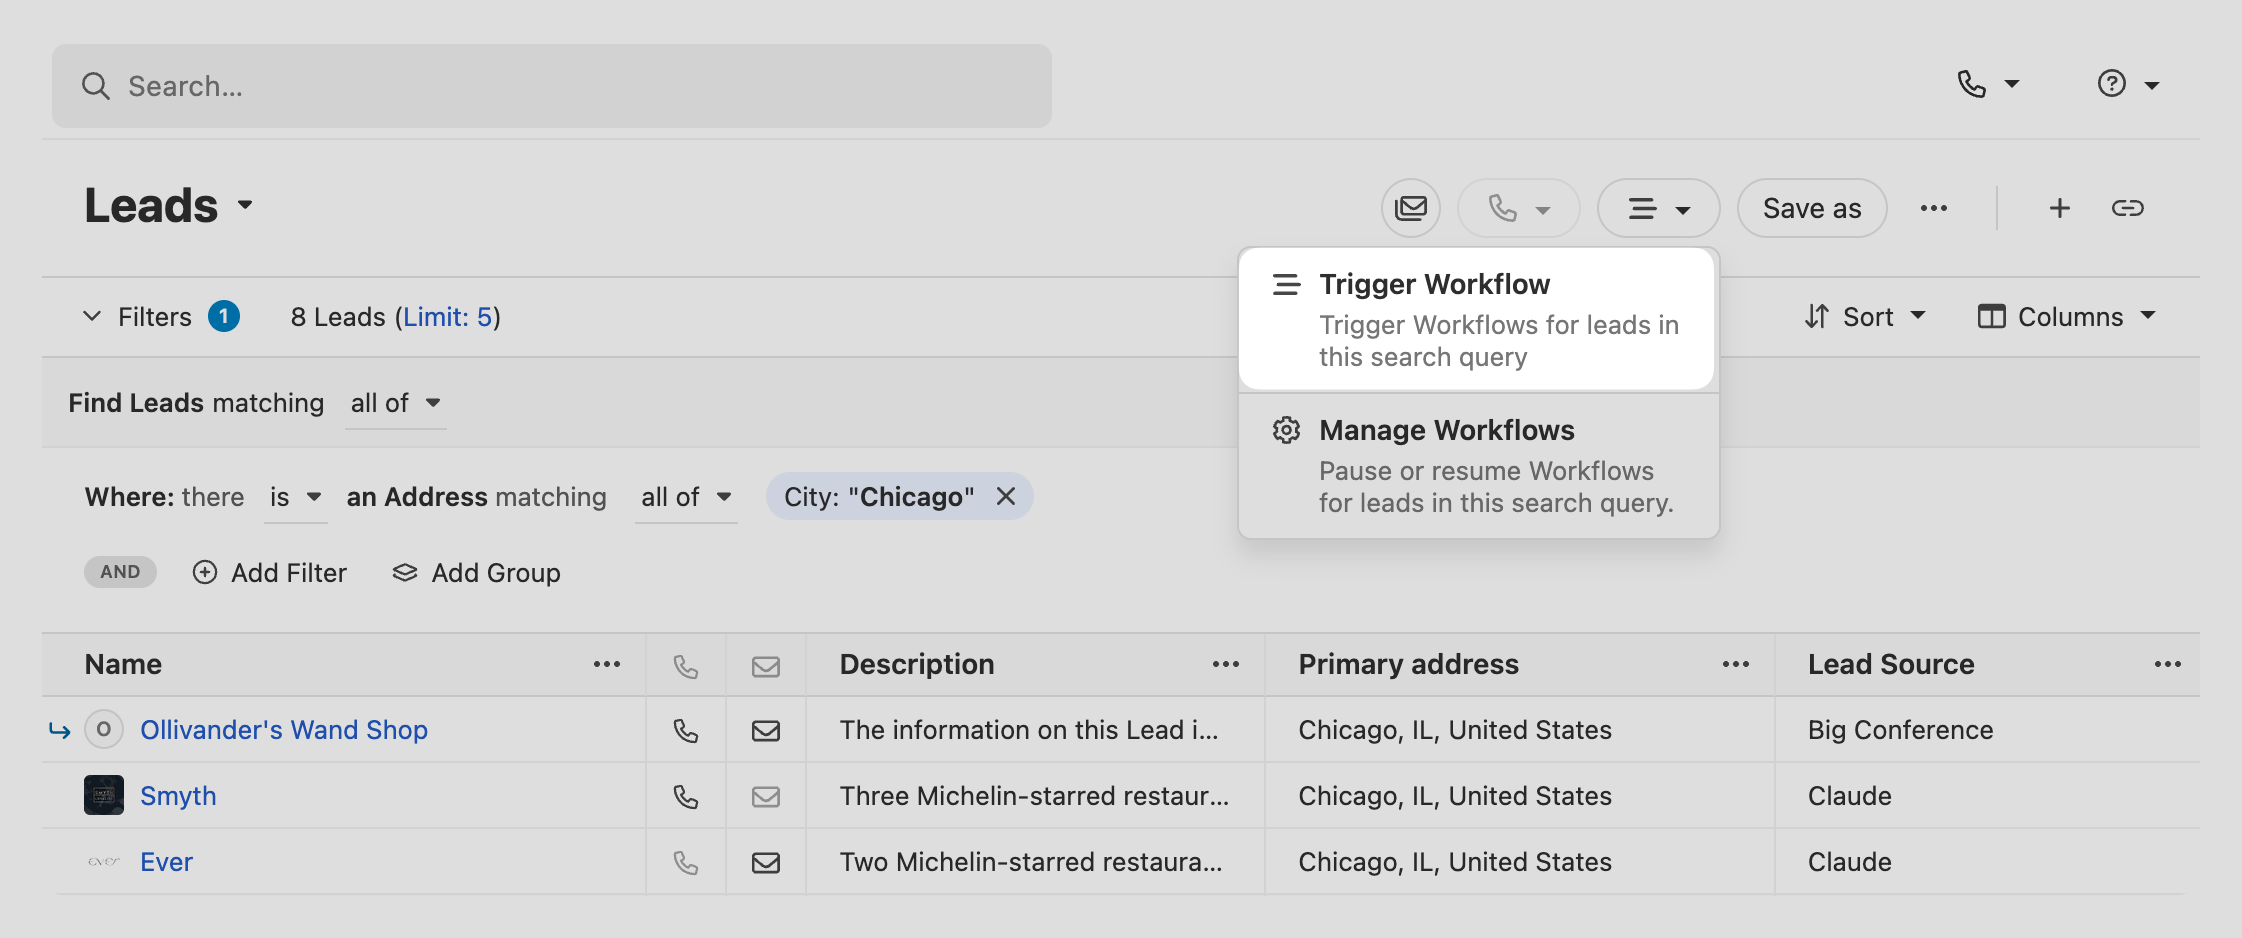
To trigger a Workflow for a list of Leads in bulk, click on the Workflow icon on the top right bar of the Leads view and select “Trigger Workflow”:
To trigger a Workflow for a list of Contacts in bulk, click on the Workflow icon on the top right bar of the Contacts view and select “Trigger Workflow”:
Need additional triggering options?
Not all search filters are currently available as Triggers. If you don't see your desired filter in the builder, give us feedback on what you're hoping to see next.
Managing Workflow Runs
Runs View
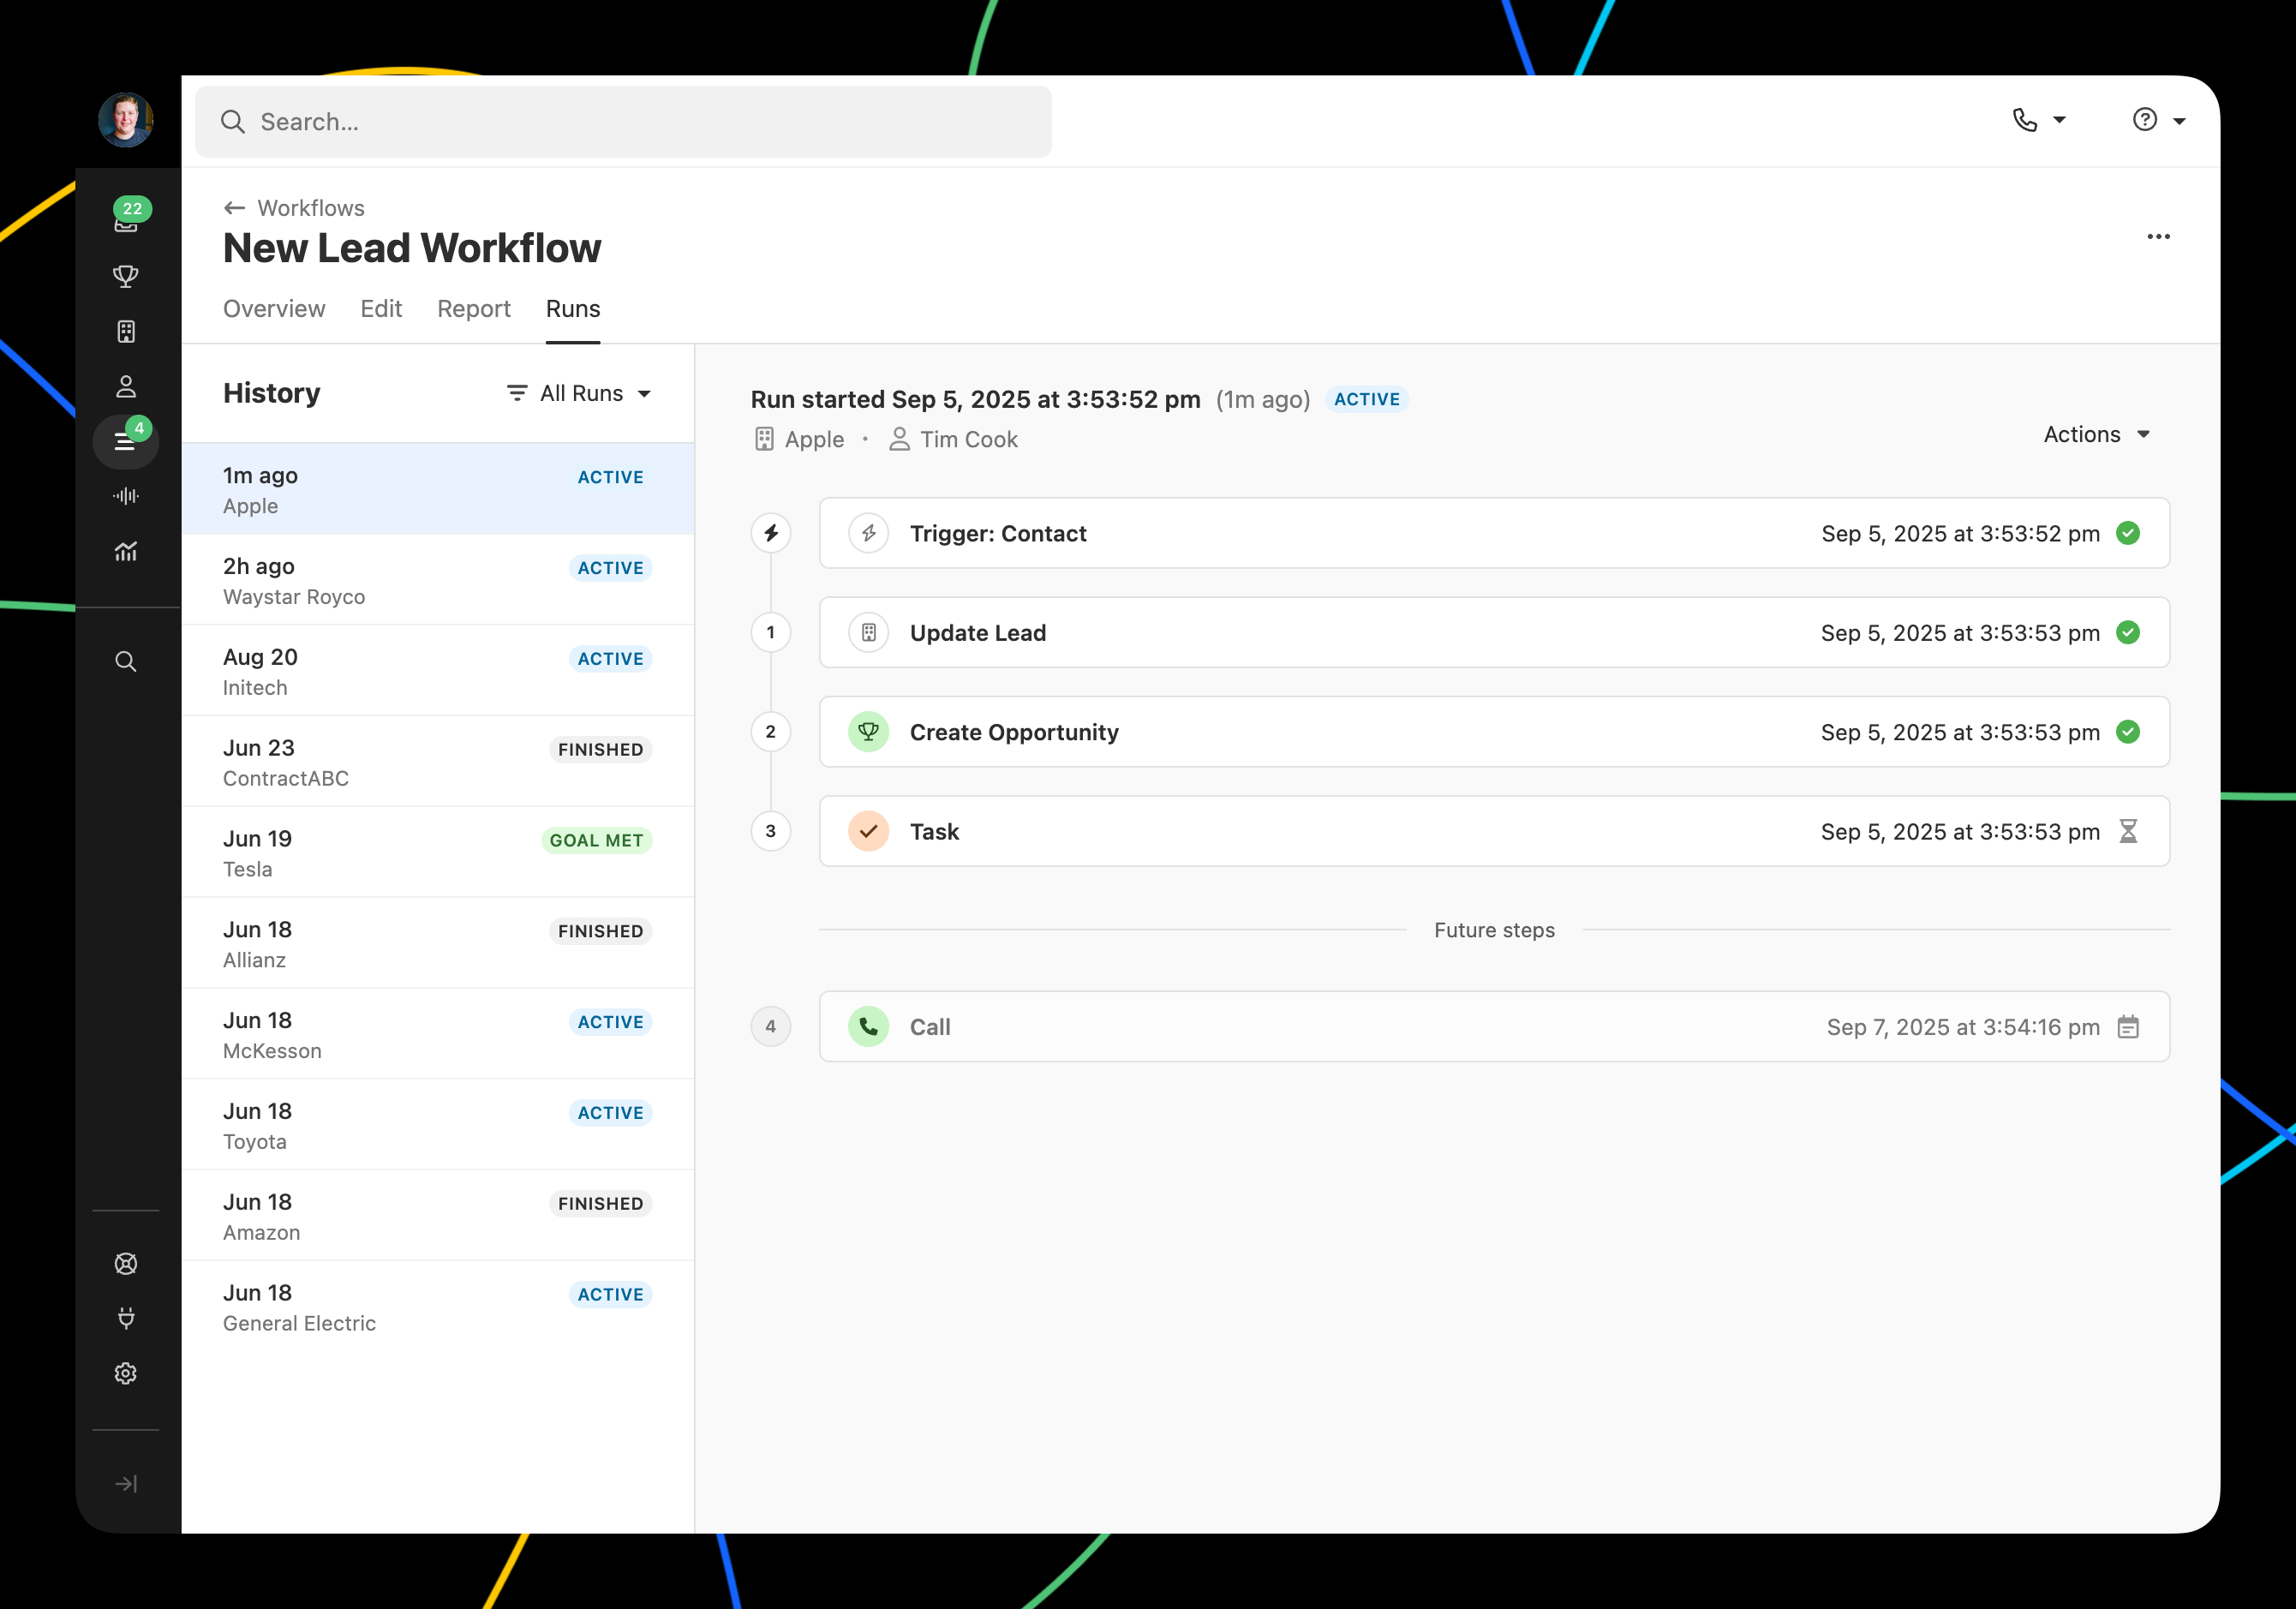
Every instance, or Run, of a Workflow can be found on the “Runs” tab of each Workflow:
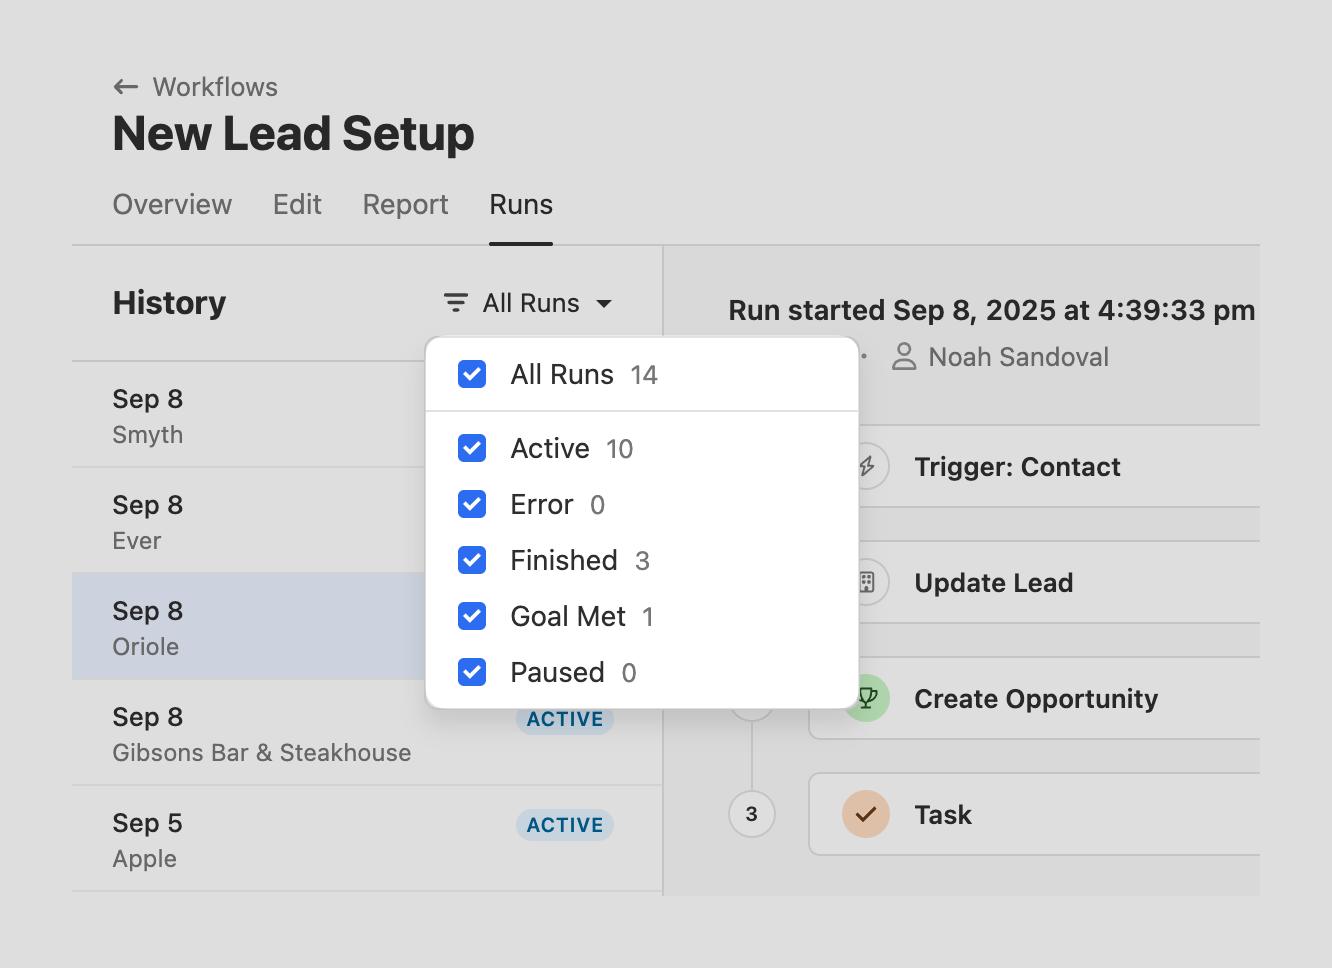
The Runs view provides details about every Run such as the current Run status, step status, and any errors. To filter Runs by status, click the “All Runs” dropdown and select the statuses you’d like to see:
You can triage any Run by selecting the “Actions” dropdown. Based on the Run’s status, you will see options to Resume, Pause, Retry, and/or Delete a Run.
To view more details about a Trigger or Step, click the expand icon:
Manage Workflow Runs from a list of Leads or Contacts
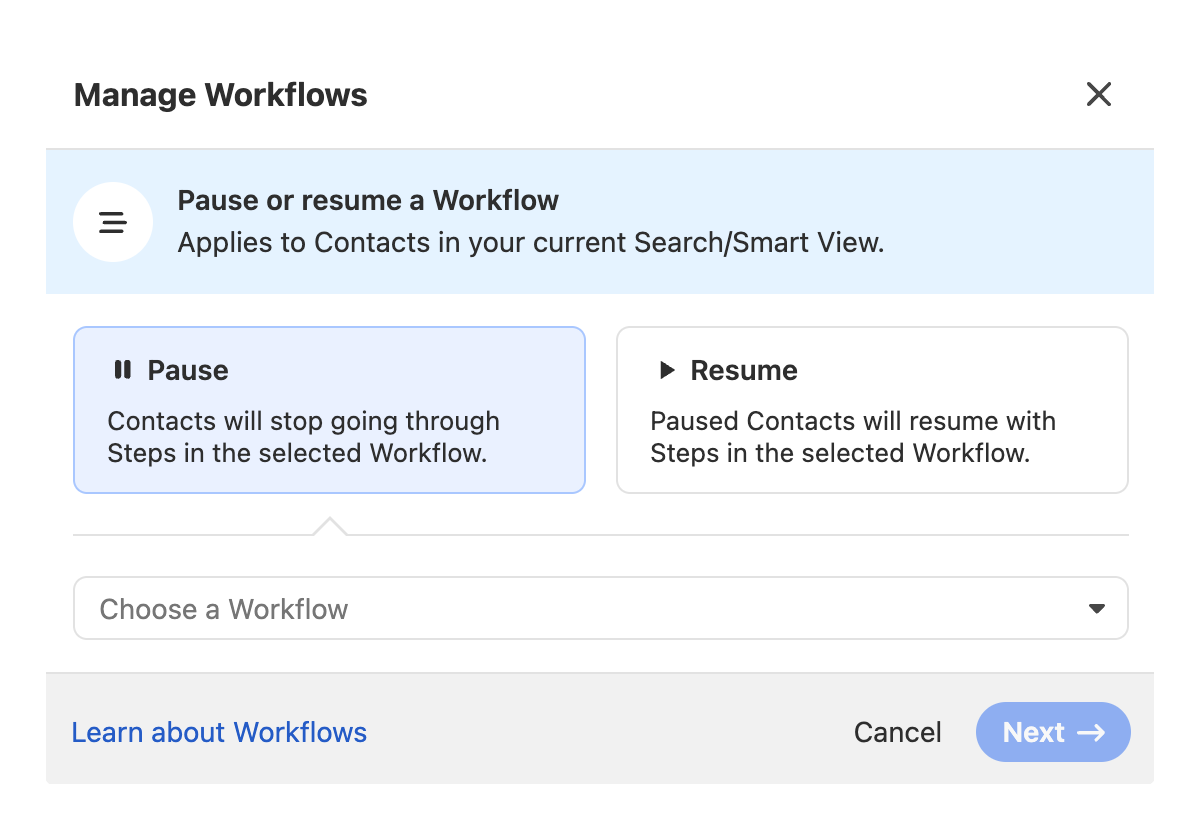
In the Leads or Contacts view, click on the Workflows icon and select “Manage Workflows” to pause or resume any runs from a specific Workflow on the listed Leads or Contacts:
Manage Workflow Runs for a specific Contact
When a Contact is a Recipient in one or more Workflow Runs, you can select "Manage Workflows" from the More icon on a Contact to view and manage individual Runs:
Rate Limits
Workflows are subject to rate limiting by Close when too many trigger events occur at the same time. When a Workflow is rate limited, Runs may be automatically paused or not processed. When rate limiting occurs, the Workflow Owner will receive an email notification with details and suggested next steps.