Steps are the individual actions that take place within a Workflow. This includes sending email or SMS, updating Leads, creating Opportunities, or assigning Tasks.
Here is a list of the current available Workflow steps:
Step | Type |
|---|---|
Communication | |
Call | Communication |
SMS | Communication |
Assign User | Operational |
Task | Operational |
Create Opportunity | Operational |
Update Lead | Operational |
Update Opportunity | Operational |
Filter | Operational |
Adding or Removing Steps to a Workflow
To add a new Step to a Workflow, click on the “Add Step” icon in the Workflow “Edit” tab and choose a Step from the list:
To remove a Step, click on the specific Step on the Editor and click the Trash icon at the bottom left of the Step editor pane.
Updating Steps on an Active Workflow
When a Workflow is updated, any saved changes are reflected immediately on any new or future steps on active Runs. This includes newly added steps, removed steps, or changes in step delays.
Changing a Step Delay
If you change the step delay on a Workflow where there are active Runs, the new delay will be used for any pending or future steps that have yet to be completed.
For example:
There is an active Workflow Run with a pending Email step in a 2-day delay.
A team member changes the step delay on that Email step to a 1-hour delay.
The Email step will be updated and set to run within an hour after the changes are saved.
Workflow Artifacts
As a Workflow processes its Trigger and Steps, each one emits “Artifacts”, or individual fields that become available for use later in the Run.
On any supported Step field, click the {} icon or type { to open the artifact menu and insert a reference to an Artifact:
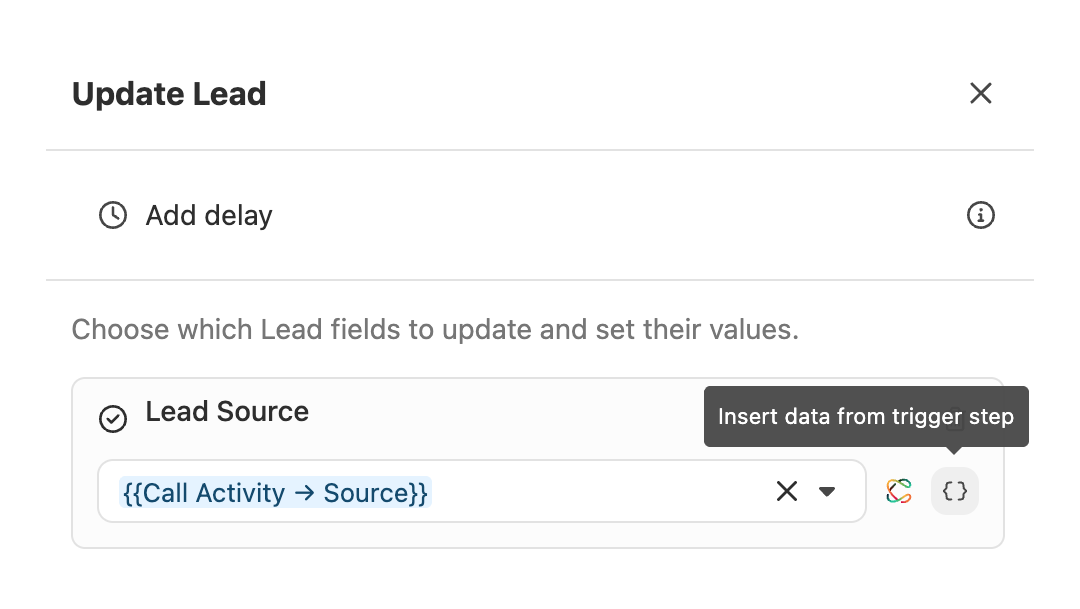
Example: If a Workflow is triggered by a Call activity, you could reference a field from the Call activity to update a Lead Custom Field on a later “Update Lead” step.
Email steps can be used to automate outreach to new leads or notify a Contact when a given event takes place. An Email step requires the following items:
Recipient — A Contact that will receive the email. There can only be one Recipient contact per Workflow. You can select the Workflow’s Recipient contact by clicking on “Recipient & Schedule” on the top right of the Workflow editor.
Send from — The user that the email will be sent from. This can be changed on a per Email step basis within a Workflow.
Template — The email template being used to fill in the content of the email.
Send from
An email step has three distinct sender options:
Creator or Enrolling User — The email will be sent from the Workflow Owner or the User who triggered the Workflow manually.
Specific User — The email will be sent from the User that is selected in a list of active users.
Assigned User in a Custom Field — The email will be sent from the User that is listed in a selected User Custom Field (Lead, Contact, or Opportunity).
When an Email step is processed and the User selected is unable to send an email (no connected email account, “Send As” is disabled for the user) or there is no User value, the step will error and the reason can be found in the Runs view.
Users can select the email account to be used in Workflows by going to Settings > Email and selecting an email account from “Default Account for Automated Workflows”. The “Auto-select email” option is recommended because Close will automatically select a connected account when the Email step is processed to ensure delivery.
Using Templates in Email steps
A shared Email Template is required for all Workflow Email steps. You can select an existing shared Email Template or create a new one by selecting “New template” or “New template from existing” at the bottom of the Template dropdown.
Send Options
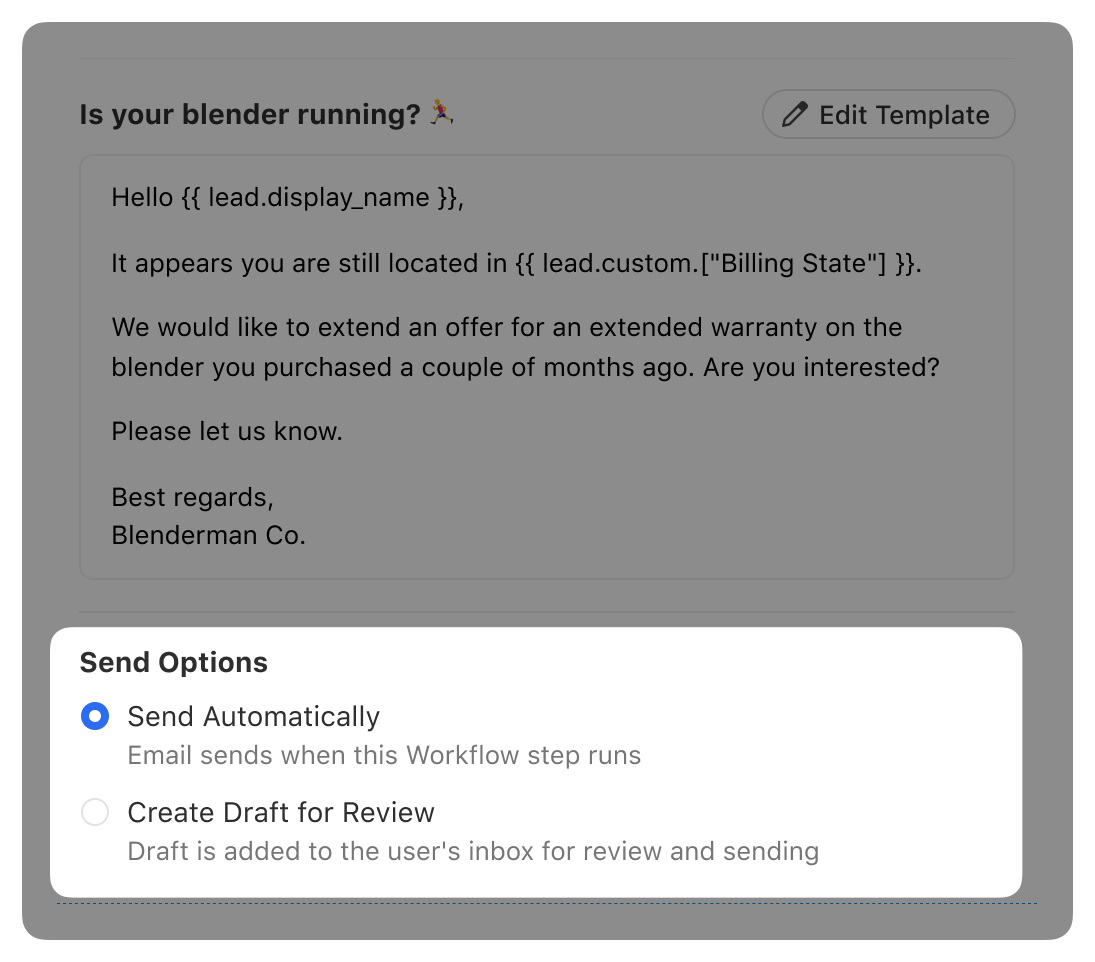
Send Automatically
By default, an Email step is sent automatically when the step is processed. The exact send time is determined by the Workflow’s Communication Window and current status of the email account’s Sending Limits.
Create Draft for Review
When selected, a draft of the email will be created for the assigned user when the step is processed and the draft can be accessed in the “Emails” tab within the assigned user’s Inbox or on the Lead Activity Feed associated with the Recipient contact.
When a draft email is created, the user must explicitly send the email. When the user sends the email, it will be queued to send like any manual email and the Workflow’s Communication Window will not be applied. Once the email has been sent, the Workflow will continue.
Ignore Workflow's Communication Schedule and Blackout Dates
When selected, the Email step will be processed immediately and ignore the Workflow's Communication Schedule and Blackout Dates. This is meant to handle situations where you would like a specific Email step to be sent regardless of what day or time it is, but you'd like the rest of the communication steps to be processed according to the Workflow's Communication Schedule and Blackout Dates.
Call
Call steps create a Call Task that can be assigned to one or many users. A Call Step requires the following items:
Recipient — A Contact that will be receiving a call. There can only be one Recipient contact per Workflow. You can select the Workflow’s Recipient contact by clicking on “Recipient & Schedule” on the top right of the Workflow editor.
Assigned User or Group — The user(s) that will be assigned a Call Task to make the call to the Recipient contact.
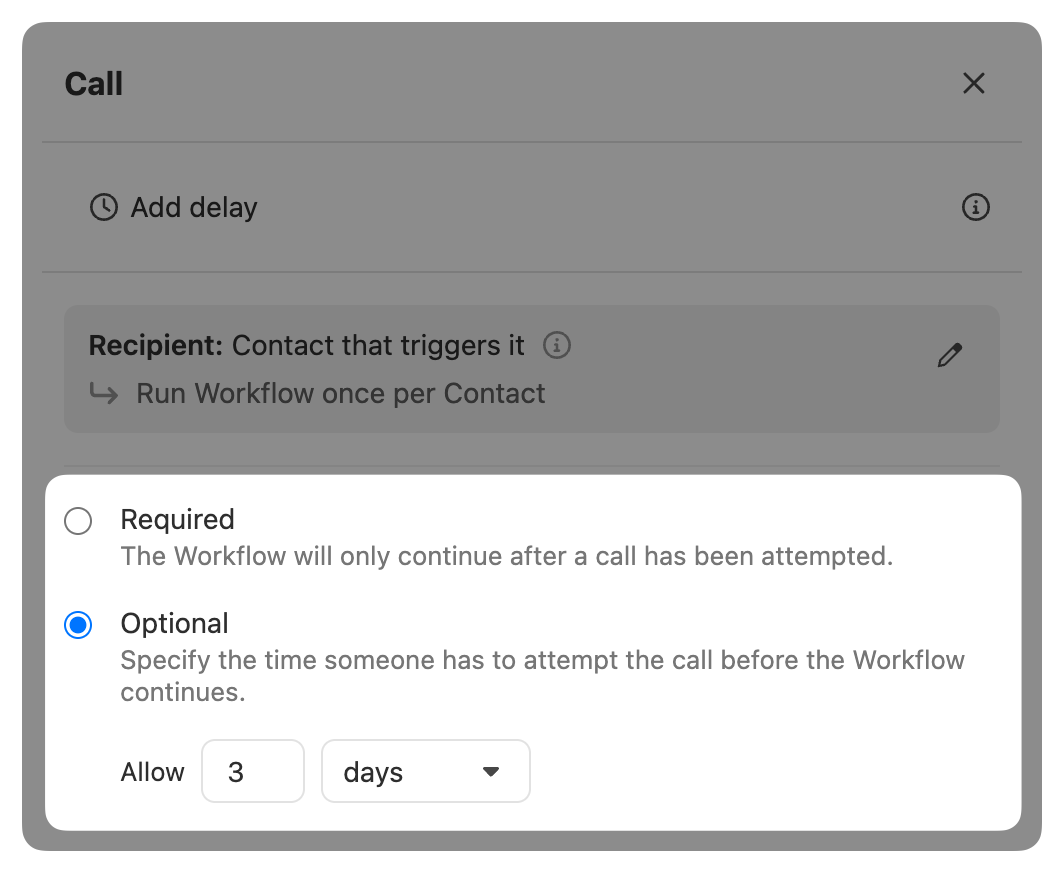
Marking a Call step optional
By default, a Call activity associated with the Recipient contact that is completed by the assigned user(s) is required before the Run can continue. If you prefer to make the Call step optional, select “Optional” and specify how many days the Call Task should remain pending before moving on to the next Step:
Call assignment options
There are four options for assigning a Call Task:
1. Creator or Enrolling User — If the Workflow Run is triggered manually, the User who triggered the Run will be assigned. If the Run was triggered automatically, the Workflow Owner will be assigned.
2. Specific User— Select an active User from your organization.
3. Specific Group — Select a User Group from your organization. Each member of the Group will be assigned. When one of the assigned users completes the Call Task, the task will be removed for the other assigned users automatically.
4. Assigned User in a Custom Field — Select a User Custom Field and the Call Task will be assigned to the user stored in that field.
5. Assigning calls to Chloe – When a Call step is assigned to Chloe, she will make the call automatically, and no rep involvement is required.
Assigning a Call step to Chloe
To assign a Call step to Chloe, select Chloe from the "Assign to" dropdown in the Call step configuration.
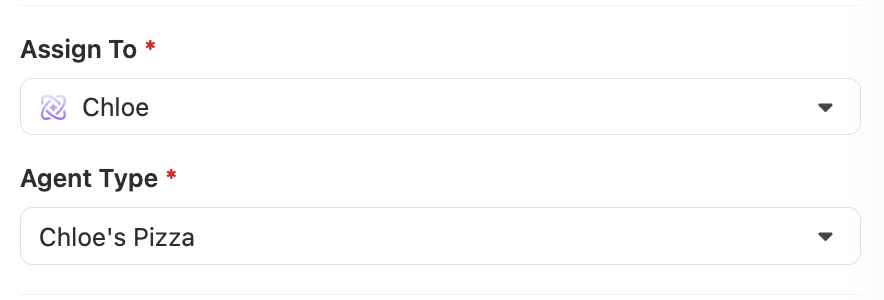
Chloe will call the Recipient contact using the phone number configured in the Chloe Agent assigned to this step.
The call is placed automatically when the step is processed, subject to your organization's concurrent call limit.
After the call, the Workflow advances based on the call's outcome or disposition, the same as any other Call step.
Call steps assigned to Chloe support required and optional behavior. If set to required, the Workflow will wait for the call to complete before advancing. If set to optional, the step will time out and the Workflow will move on after the configured number of days.
Chloe is limited to the US.
The Recipient contact must have a valid US phone number.
For more on setting up and configuring Chloe, see Setup & Implementation.
Making Calls assigned to you via Workflows
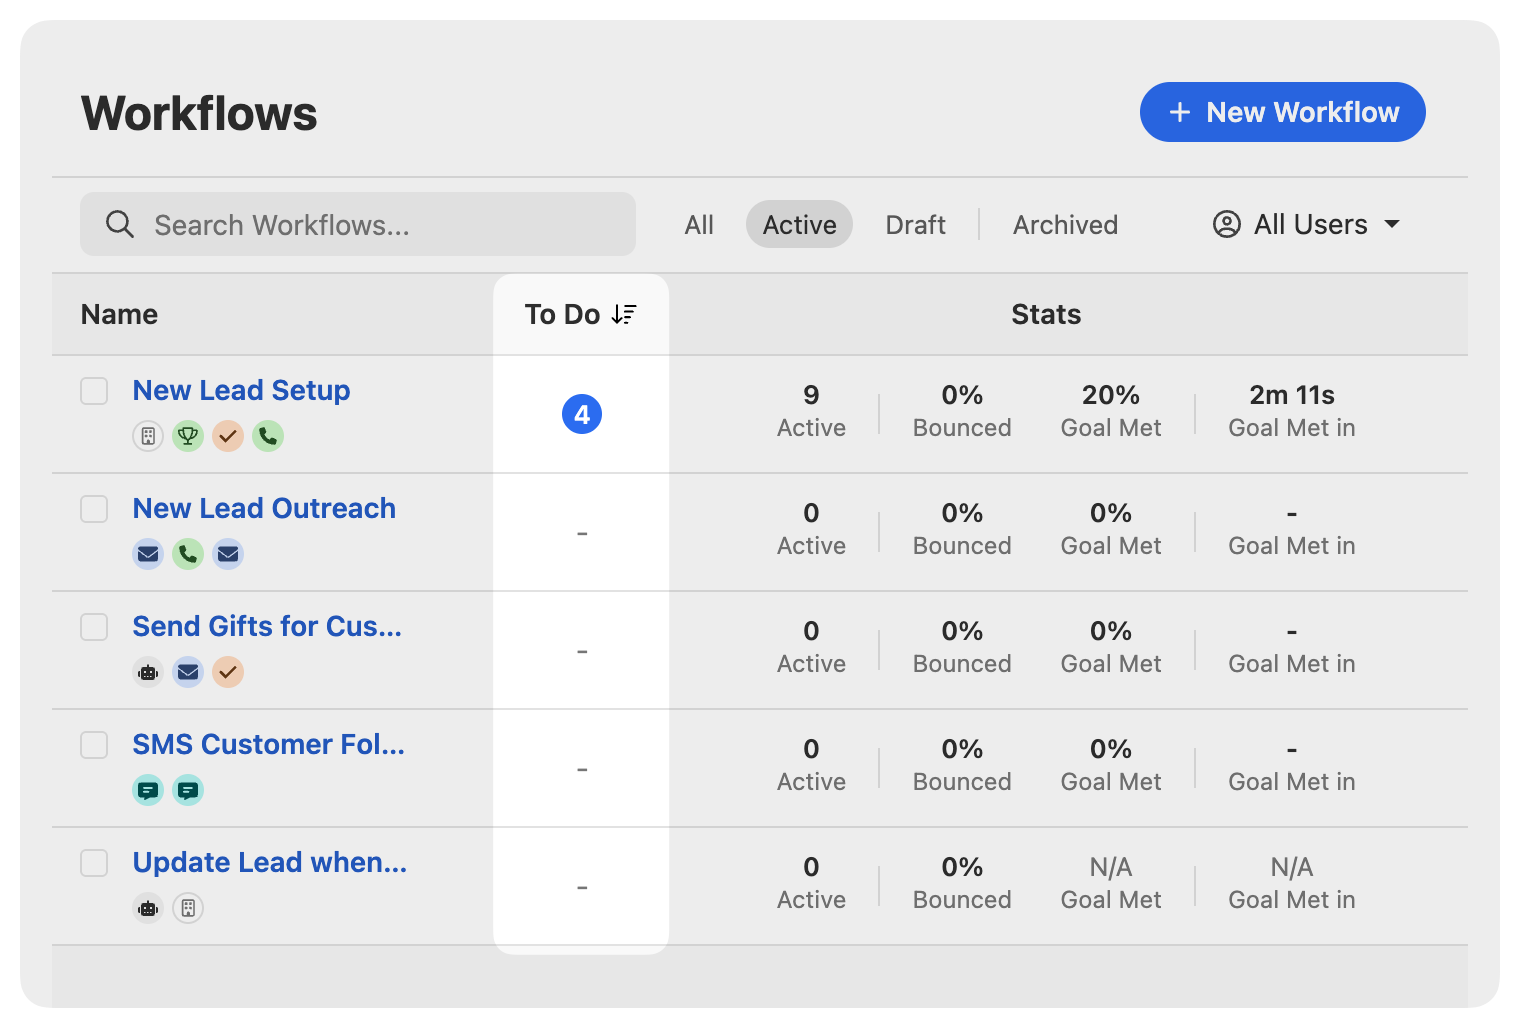
On the Workflows list, any incomplete Call Tasks assigned to you will appear as a badge under the “To Do” column:
You can filter, view, or start calling the list of incomplete Call Tasks assigned to you on the Workflow Overview:

By default, the Filters are configured to match the Workflow’s Communication Window. Once you adjust the Filters, Close will remember your previous settings. When you select “View Contacts”, you will be taken to a filtered Contact search that displays all of the Contacts where there is an incomplete Call Step based on your filters. When you select “Start Calling”, Close will initiate a Power Dialer session in the same filtered Contact search.
Managing and completing Call Tasks
Call Tasks represent an intent to call a Contact. A Call Task will be automatically marked as complete when the assigned user makes a call to one of the Contact's phone numbers and the call ends with a "Completed" status. Calls logged manually using Log a call will also mark the Call Task as complete.
If a call is attempted but ends with a failed status (Busy, No Answer, Cancel, Failed, etc.), the Call Task will be automatically marked as Skipped, which will also skip the linked Workflow Step. This allows the Workflow to continue to the next step.
A Call Task will also be marked as Skipped when:
The Contact doesn't have a phone number
The Call step was set to "optional" and the allotted time expires
Ignore Workflow's Communication Schedule and Blackout Dates
When selected, the Call step will create a Call Task immediately and set the Call Task due date to the same time the step was processed. This is meant to handle situations where you would like a specific Call step to be due immediately, but you'd like the rest of the communication steps to be processed according to the Workflow's Communication Schedule and Blackout Dates.
Mark as Responded
On any Call Activity associated with a Contact that is a Recipient in an active Workflow Run(s), a “Mark as Responded” (or “Mark all as Responded” if the Contact is associated with multiple active Runs) option will appear at the bottom of the Call Activity:
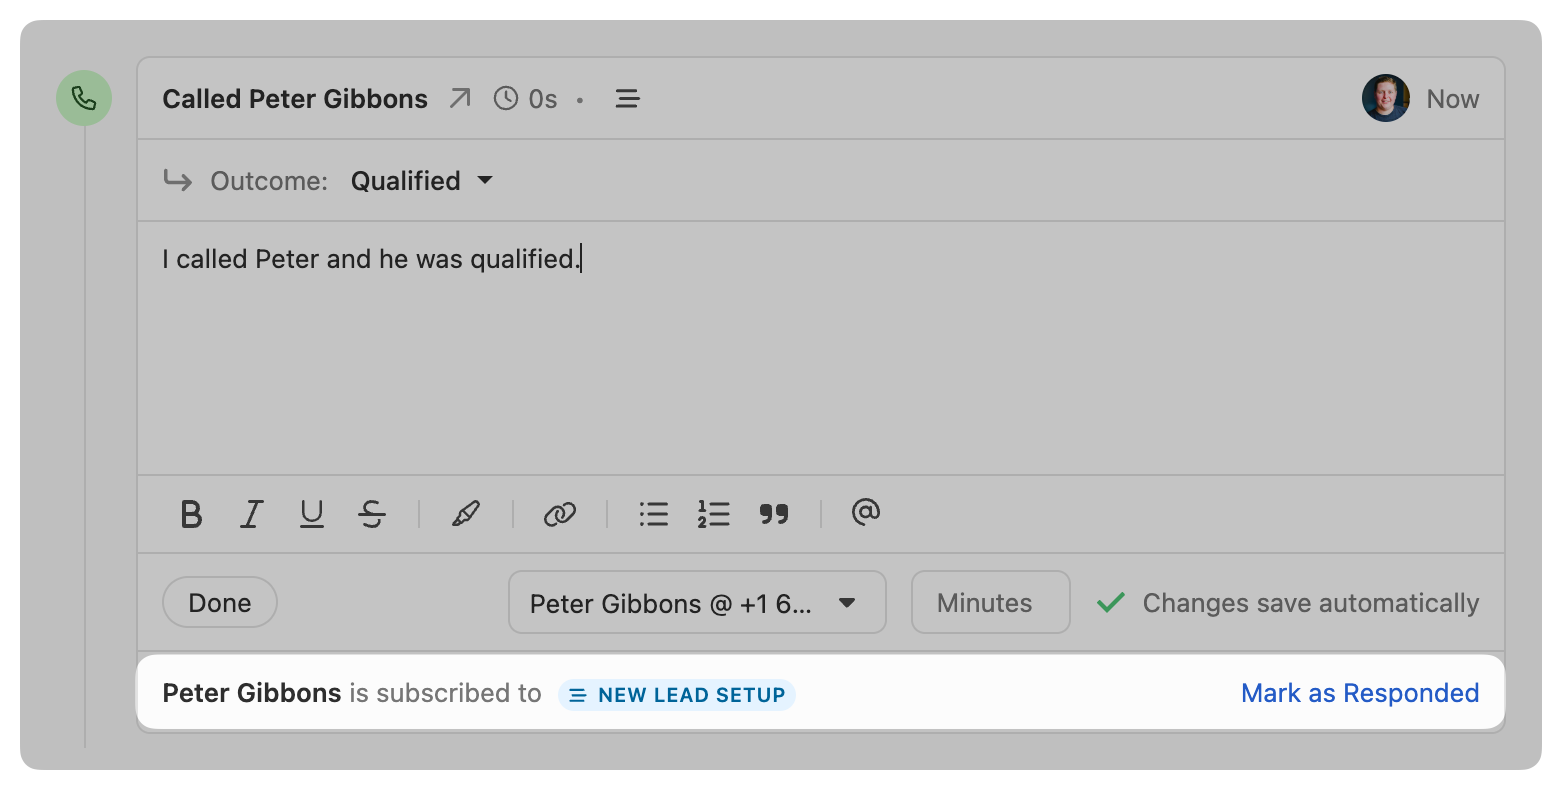
If you reached the Contact and want to pause the Workflow Run(s), select “Mark as Responded”. This will pause the Run and mark the Contact as converted via Workflow Goals.
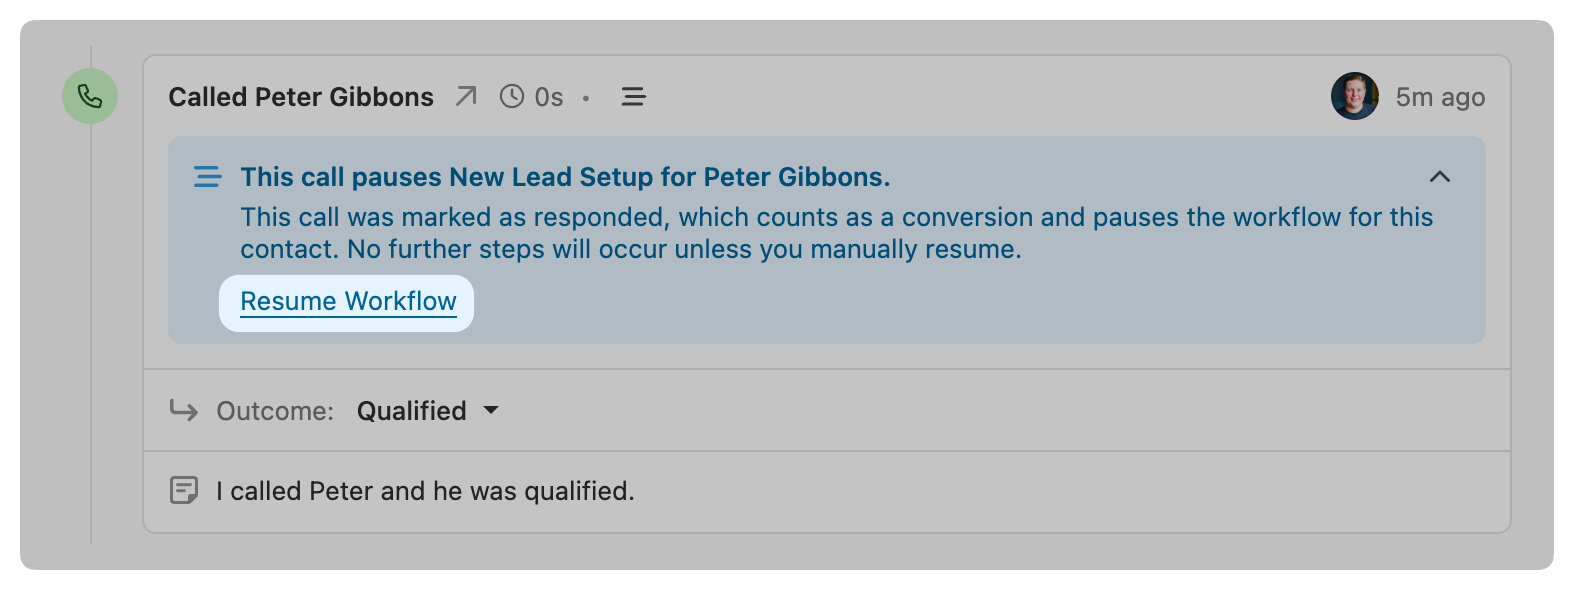
If you want to resume the Workflow Run, you can manually resume it on the Call Activity by selecting “Resume Workflow”:
SMS
SMS steps can be used to automate outreach to new leads or notify a Contact when a given event takes place. An SMS step requires the following items:
Recipient — A Contact that will receive the SMS. There can only be one Recipient contact per Workflow. You can select the Workflow’s Recipient contact by clicking on “Recipient & Schedule” on the top right of the Workflow editor. The Contact’s primary number (the first phone number listed) will receive the SMS. There is no way to send the SMS step to all phone numbers for a given Contact.
Send from — The user that the SMS will be sent from. This can be changed on a per SMS step basis within a Workflow.
Template — The SMS template being used to fill in the content of the SMS.
Send from
An SMS step has three distinct sender options:
Creator or Enrolling User — The SMS will be sent from the Workflow Owner or the User who triggered the Workflow manually.
Specific User — The SMS will be sent from the User that is selected in a list of active users.
Assigned User in a Custom Field — The SMS will be sent from the User that is listed in a selected User Lead Custom Field.
If the phone number is not SMS enabled, an error will occur and the SMS step will be skipped.
When triggered automatically, the SMS will be sent from the sending user’s primary phone number. You can select which SMS enabled phone number should be used for the SMS steps when you are triggering the Workflow manually.
🌎 Sending SMS to different countries
If the Recipient Contact’s phone number is from a different country than the sending user’s phone number, Close will attempt to send the SMS from a matching phone number (if one is available).
Using Templates in SMS steps
A shared SMS Template is required for all Workflow SMS steps. You can select an existing shared SMS Template or create a new one by selecting “New template” or “New template from existing” at the bottom of the Template dropdown.
Send Options
Send Automatically
By default, an SMS step is sent automatically when the step is processed. The exact send time is determined by the Workflow’s Communication Window and current status of the email account’s Sending Limits.
Create Draft for Review
:::(Warning) (👀) This functionality is in development and will be available soon.
:::
When selected, a draft of the SMS will be created for the assigned user when the step is processed and the draft can be accessed in the “SMS” tab within the assigned user’s Inbox or on the Lead Activity Feed associated with the Recipient contact.
When a draft SMS is created, the user must explicitly send the SMS. When the user sends the SMS, it will be queued to send like any manual SMS and the Workflow’s Communication Window will not be applied. Once the SMS has been sent, the Workflow will continue.
Ignore Workflow's Communication Schedule and Blackout Dates
When selected, the SMS step will be processed immediately and ignore the Workflow's Communication Schedule and Blackout Dates. This is meant to handle situations where you would like a specific SMS step to be sent regardless of what day or time it is, but you'd like the rest of the communication steps to be processed according to the Workflow's Communication Schedule and Blackout Dates.
MMS support
At this time, MMS messages containing photos and attachments are not supported in SMS steps. You can still send photos and attachments to your contacts by manually sending an SMS from the Lead page.
Telephony usage in SMS steps
SMS sent as part of a Workflow will incur the same telephony usage costs as any other SMS sent from Close.
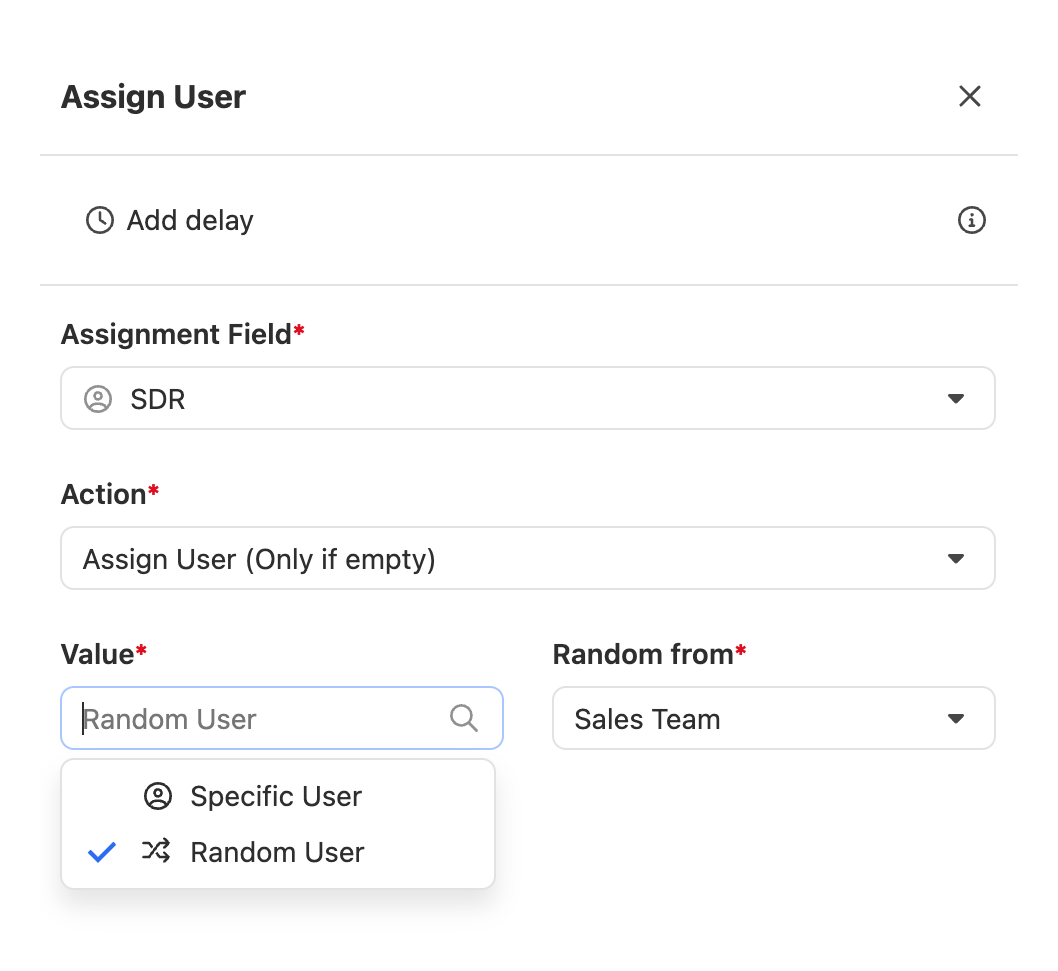
Assign User
The Assign User step can assign or unassign Users to a Lead via a User Custom Field. You can assign a specific user or randomly assign a user from within a Group.
Assign User supports three action types:
Assign User (Only if empty) — Only adds a user to the Custom Field when it is empty.
Assign User (Overwrite existing) — Adds or replaces a user to the Custom Field.
Unassign User — Clears the User from the selected Custom Field.
Random Assignment Logic
Adding the same user to multiple Groups does not increase their chances of being assigned Leads. When using multiple Groups in a Workflow step (e.g., for email senders or lead assignment), Close expands those groups into a single list of unique, active users and randomly selects from that pool. A user appearing in more than one group will still only be included once in the final selection set.
For example, if Group A contains Alex, Group B also contains Alex, and Group C contains Jordan — the system will treat Alex and Jordan as equally likely to be selected. Alex will not be favored despite appearing in multiple groups.
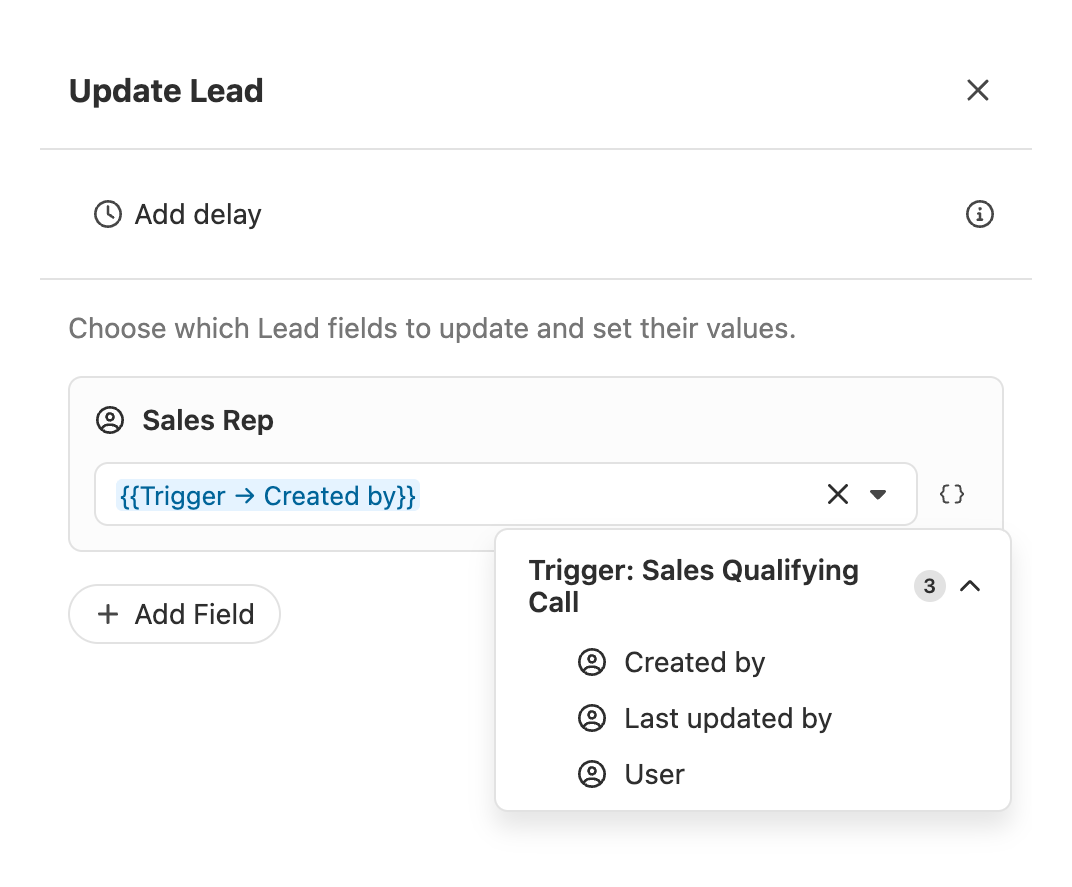
Assign Users to Leads dynamically
In situations where you want to assign a User to a Lead based on an activity they created (ex: published a Custom Activity, created an Opportunity, made a Call with a certain Outcome, etc), you can use the Update Lead step to update the User Custom Field by referencing data from the trigger event using the artifact menu:
Round Robin Lead Assignment
The Assign User step does not support round robin or rotation assignment at this time. In order to accomplish this, we recommend using Zapier and Google Sheets. Here is a video tutorial and Google Sheet template with step-by-step instructions:
Task
Task steps are used to create and assign Lead Tasks. A Task step requires the following items:
Description — A description of the Task (ex: “Follow up”)
Due Date — Select when the Task due date should be. Chose from “immediately” (when the step is processed) or X minutes, hours, or days after the step is processed.
Assign To — The user the Task will be assigned to. Assign To has three options for assigning the Task:
Creator or Enrolling User — The Task will be assigned to the Workflow Owner or the User who triggered the Workflow manually.
Specific User — The Task will be assigned to the User that is selected from a list of active users.
Assigned User in a Custom Field — The Task will be assigned to the User that is listed in a selected User Lead Custom Field.
Marking Tasks as optional
By default, the Task must be completed by the assigned User in order for the Workflow Run to continue. When “Optional” is selected, the Run will continue immediately after the Task is created (regardless of the task’s due date):

Create Opportunity
The Create Opportunity step will create a new Opportunity on the Lead associated with the trigger. When selected, all of an Opportunity’s standard fields (Value, Note, Status, etc) will appear. To an Opportunity Custom Field, select “Add Custom Field”.
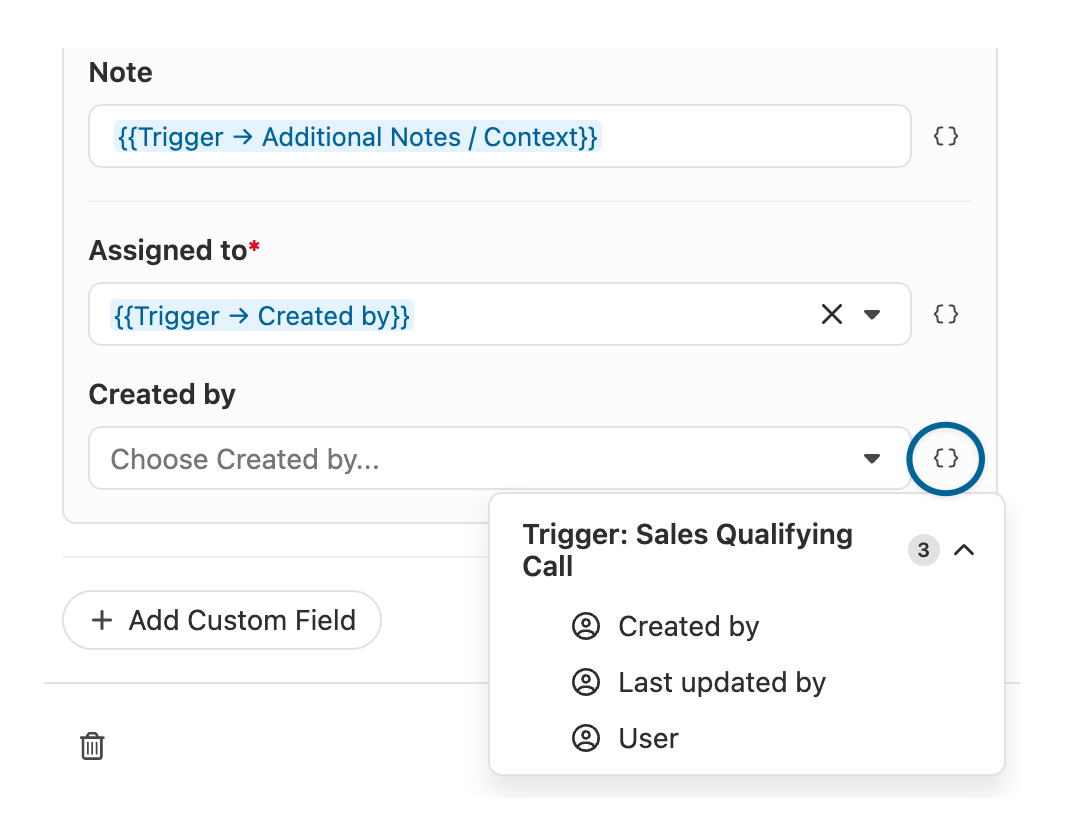
Fields can be dynamically filled in by referencing data from the trigger. On any supported field, click the {} icon to the right of the field to open the artifact menu and any supported options will appear:
Update Lead
The Update Lead step will update any selected fields on the Lead associated with the trigger. One or multiple fields can be updated in a single step, and fields can be updated using static values, dynamically using reference data from the trigger event, or via Enrichment.
Field options
At the bottom of the step, there are two options to review:
Overwrite existing values — When enabled, this will replace any existing data in the fields. When disabled, only the empty fields will be updated.
Add selected values to Choice fields if they don’t exist — When enabled, new options will be automatically added to Choice fields if they don’t already exist as choices. This option only appears if one of the selected fields is a Choice (single or multi) field.
Here is what you can expect to happen based on how the Field options are configured on the Step:
Field options configuration | Expected Behavior |
|---|---|
☑️ Overwrite existing values | 1. For any choice field (single or multi), add any nonexistent value(s) to the list of choices. |
◽ Overwrite existing values | 1. Don’t update any fields that have existing values. |
◽Overwrite existing values | 1. For any choice field (single or multi), add any nonexistent value(s) to the list of choices. |
☑️ Overwrite existing values | 1. For all selected fields, replace any existing values with the specified value. |
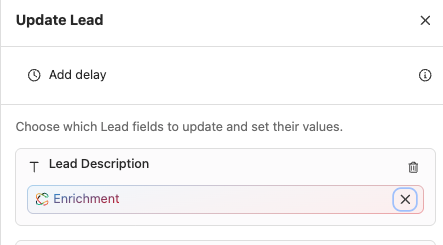
Update Fields using Enrichment
When supported, the Enrichment icon will appear as an option for updating the field. To use Enrichment for a specific field, click on the icon to the right of the field:
Update Opportunity
The Update Opportunity step will update any selected fields on a specific Opportunity on the Lead associated with the trigger.
Selecting which Opportunity to update
.png)
When the Opportunity event trigger is selected, there are three choices for which Opportunity you can update:
The Opportunity that triggered the Workflow
The newest Opportunity on the Lead (by date created)
The oldest Opportunity on the Lead (by date created)
For all other trigger types, you can update the newest Opportunity on the Lead or the oldest Opportunity on the Lead (by date created).
Field options
At the bottom of the step, there are two options to review:
Overwrite existing values — When enabled, this will replace any existing data in the fields. When disabled, only the empty fields will be updated.
Add selected values to Choice fields if they don’t exist — When enabled, new options will be automatically added to Choice fields if they don’t already exist as choices. This option only appears if one of the selected fields is a Choice (single or multi) field.
Here is what you can expect to happen based on how the Field options are configured on the Step:
Field options configuration | Expected Behavior |
|---|---|
☑️ Overwrite existing values | 1. For any choice field (single or multi), add any nonexistent value(s) to the list of choices. |
◽ Overwrite existing values | 1. Don’t update any fields that have existing values. |
◽Overwrite existing values | 1. For any choice field (single or multi), add any nonexistent value(s) to the list of choices. |
☑️ Overwrite existing values | 1. For all selected fields, replace any existing values with the specified value. |
Filter
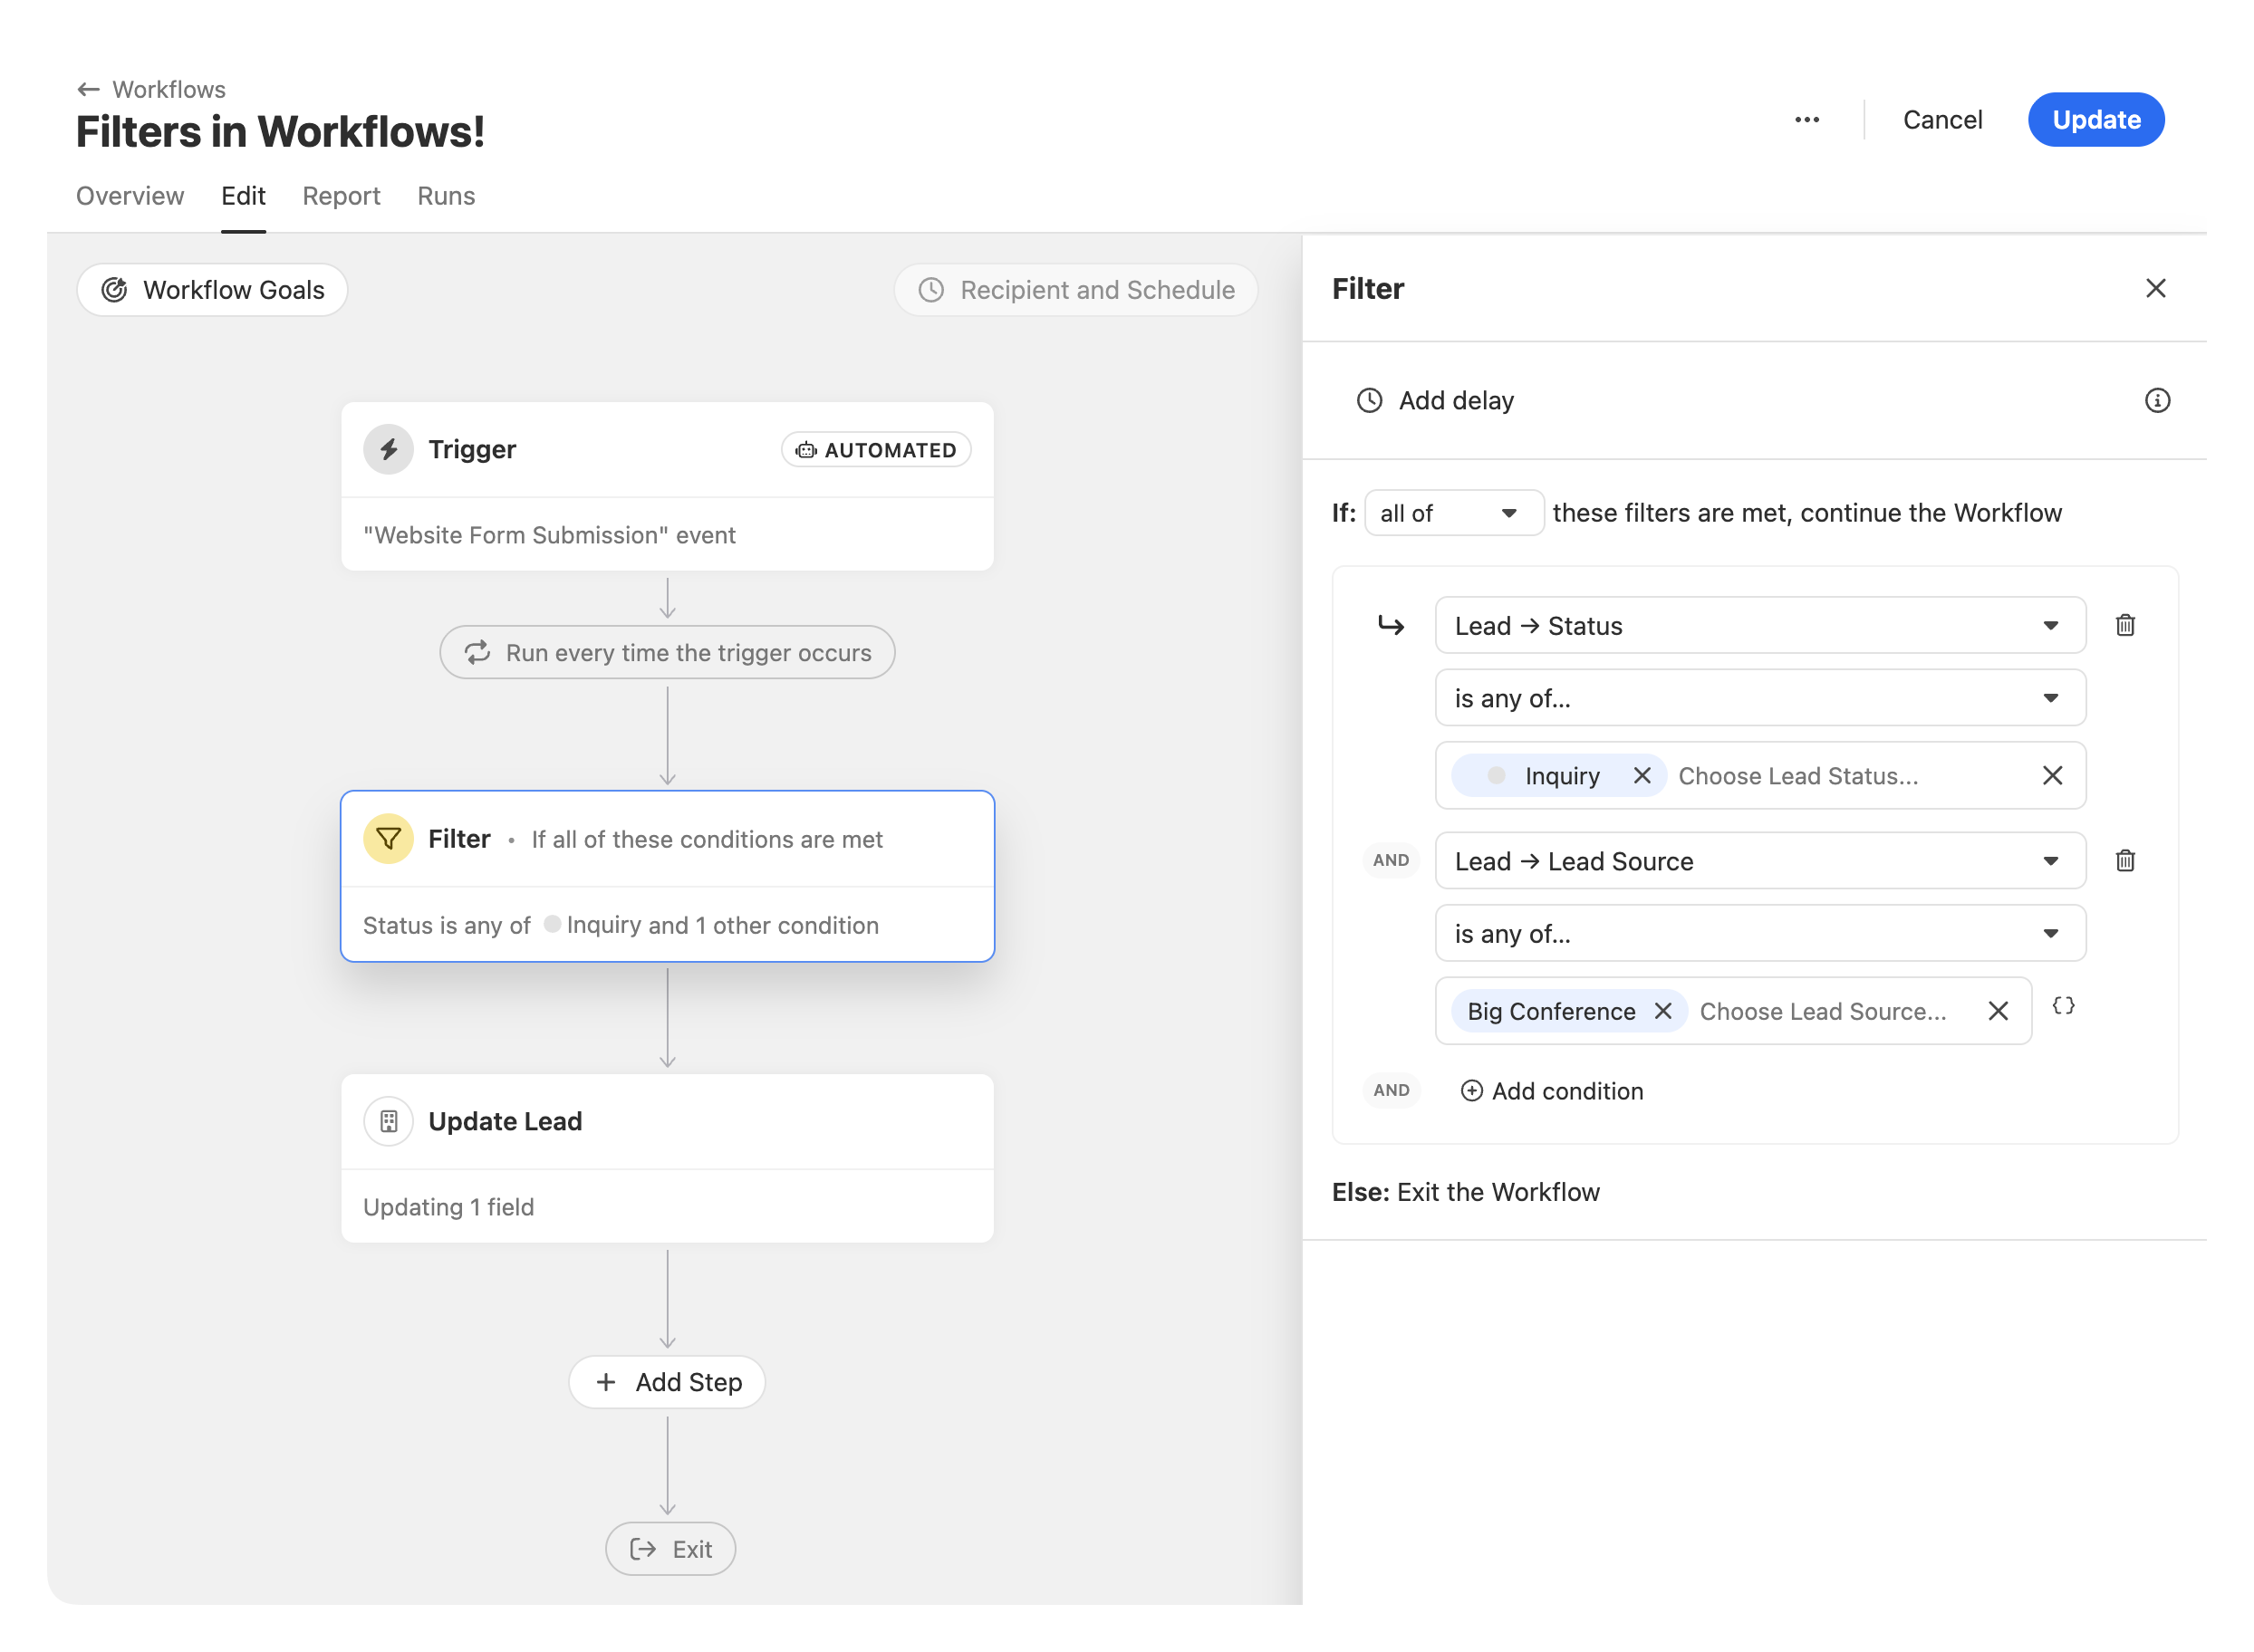
Add a Filter step anywhere in your Workflow to check conditions on the Trigger or Lead. If the Filter conditions are met, the Run will continue. If the Filter conditions are not met, the Run will be paused.
The step is best used for situations like:
My Workflow triggers when an event occurs (Call, Custom Activity, Meeting, etc), but I only want the Workflow to continue on Leads where the current Lead Status is "Customer".
I want to trigger a Workflow on a Contact, but I want to check certain conditions on the Lead before the Workflow continues.
Configuring Filter conditions
To add a Filter condition, start by selecting a field. The Filter step supports all fields available in the artifact menu. Based on the field you select, you will be shown a list of available operators for that field ("is exactly", "greater than", "is present", etc). Once you have a field and operator selected, add the value you want the Filter step to check. If you'd like the value to be a field reference use the { shortcut or click the {} icon to the right of the field to insert a reference variable.
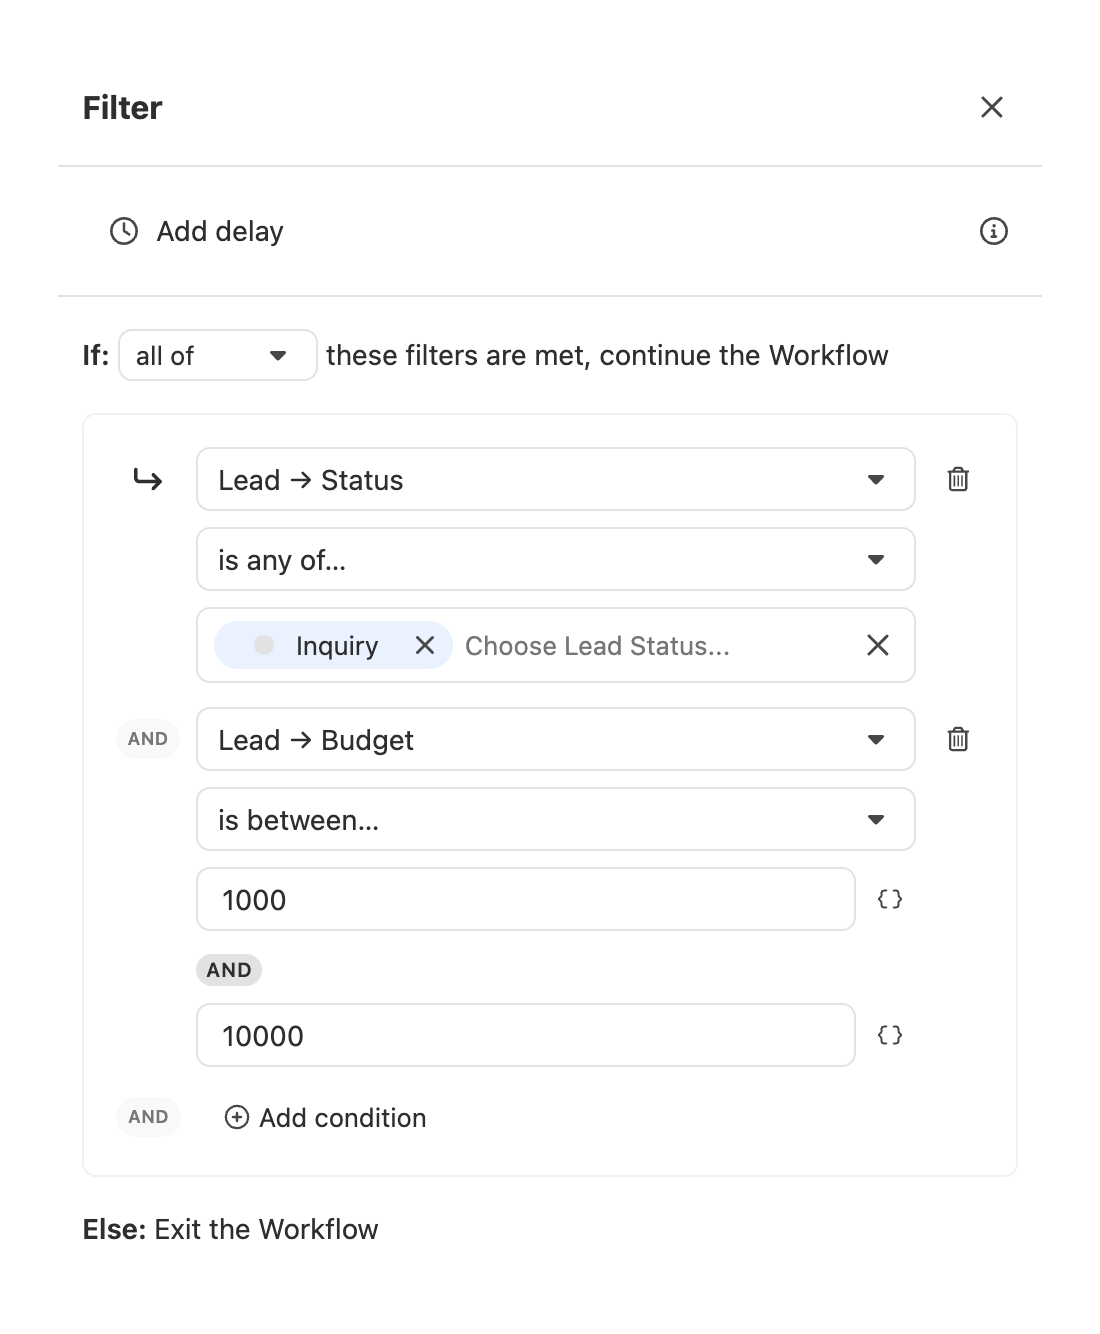
For example, here is what the Filter conditions should look like if you only want the Workflow to continue if the Lead Status is "Inquiry" and the "Budget" Lead Custom Field value is between 1000 and 5000:
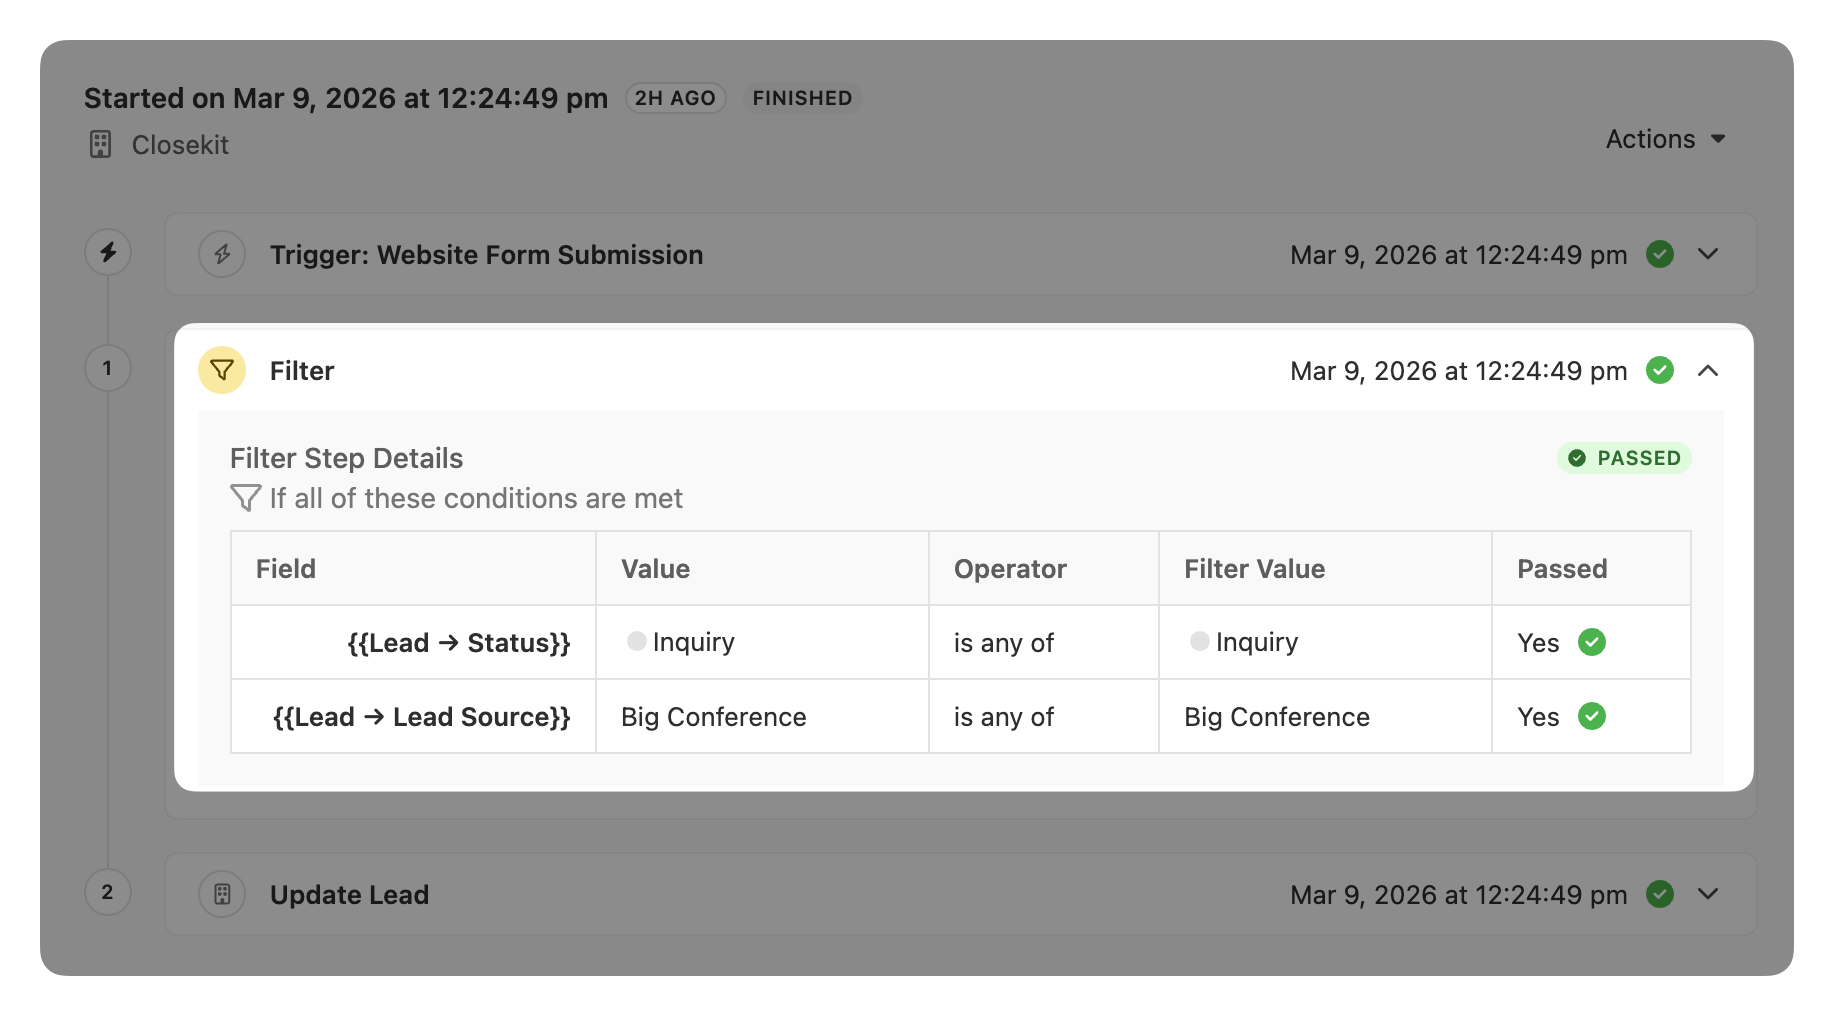
Filter steps in the Runs View
When a Filter step is present on a Workflow, the Runs view will display the full conditions before it has processed. Once the step has processed, the results will be displayed in the Step details.
If the conditions were met, the step will display a PASSED status and the Run will continue to the next step:
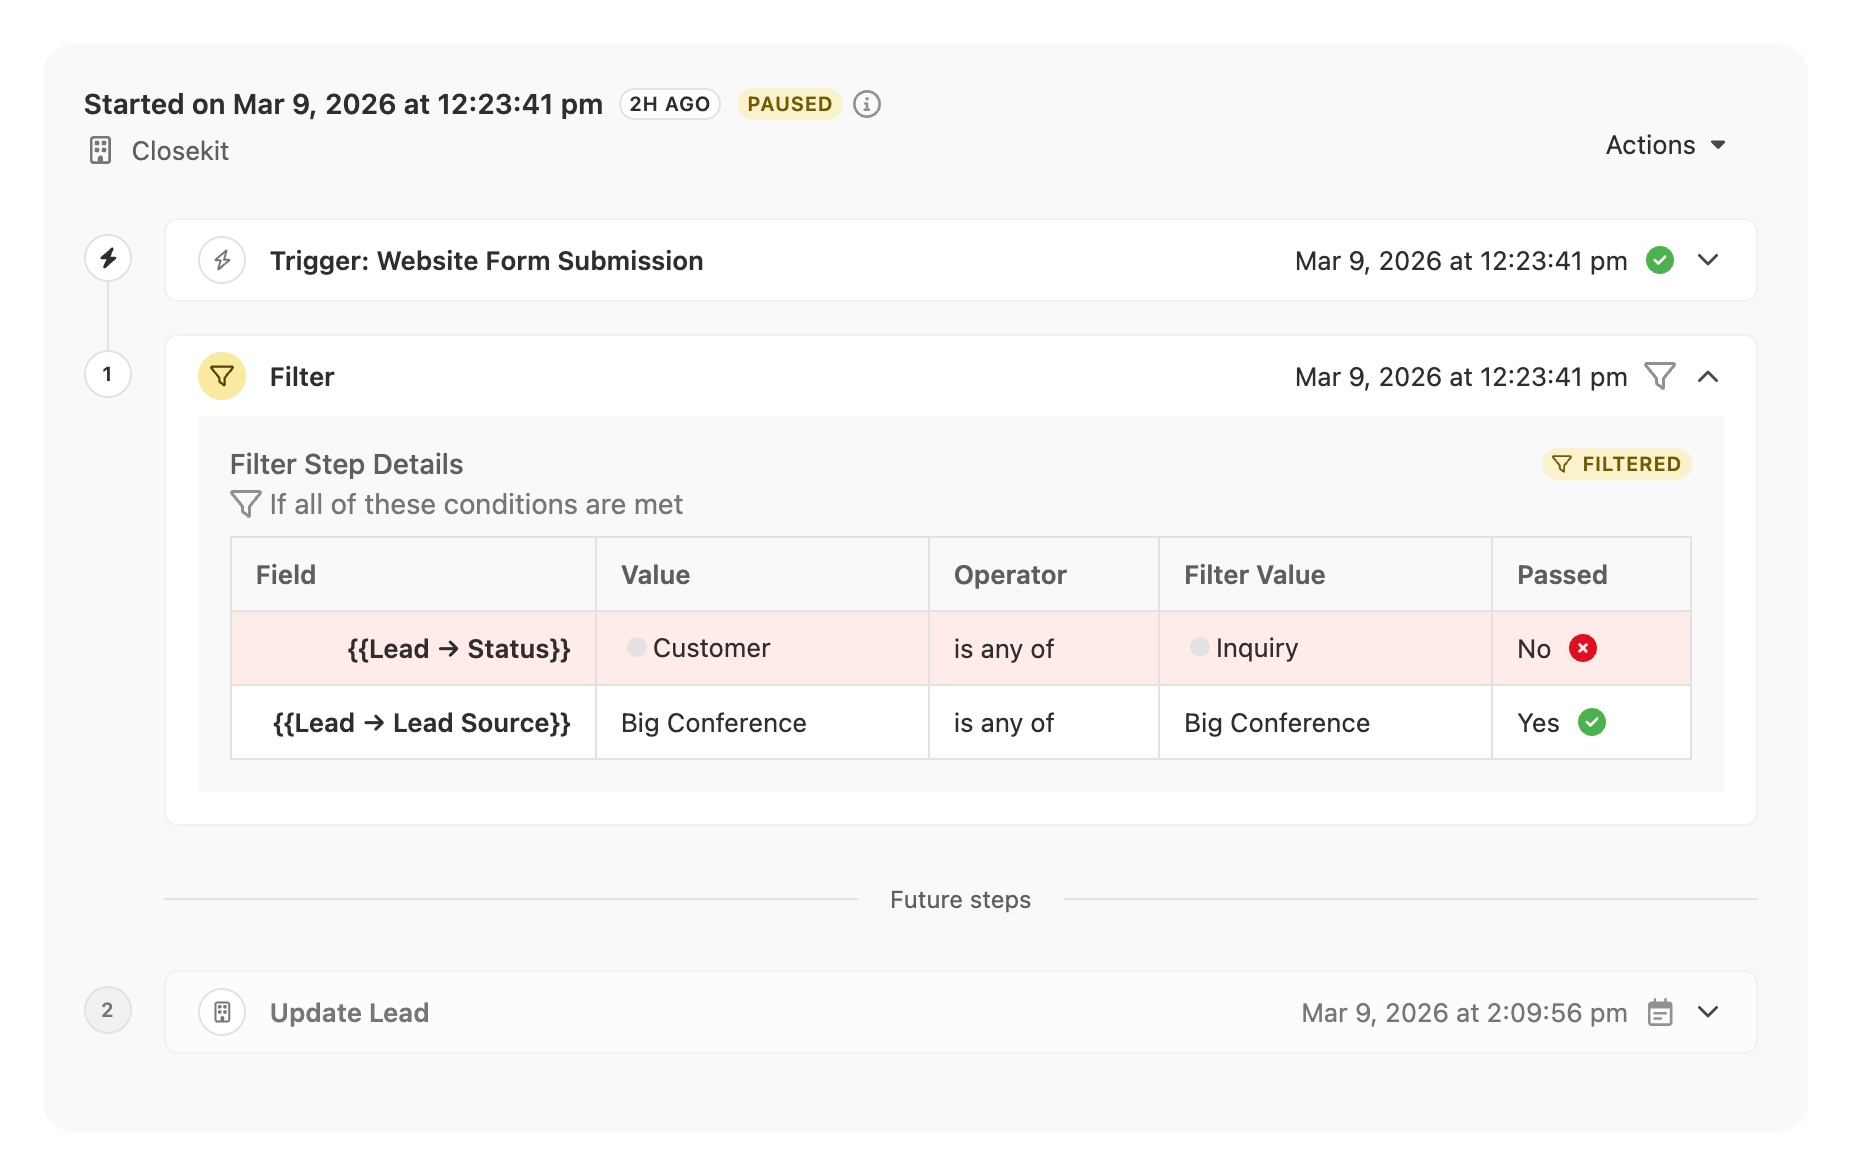
If the conditions were not met, the step will display a FILTERED status and the Run will be paused:
Resuming a Run after a Filtered step
If you would like a Run to resume after it was paused due to a
FILTERED
step, just navigate to the Run in the Runs view and click "Resume" from the Actions menu at the top left. The run will continue immediately and process the next step in the Workflow.