The top tips and common mistakes to keep in mind when importing your data.
Close is the most powerful when your data lives in the right places. Having a good understanding of the data importing process will allow for easy searching, powerful Smart Views, and the ability to automate as your team grows. Here are the essential steps to take and the common mistakes to avoid when importing your Leads into Close.
1. Understand the Different Types of Data Fields
The first step is to understand the types of fields that are available.
Close has both Standard Fields, which are built-in fields created by default, and Custom Fields, which you can customize to your needs.
Standard Fields
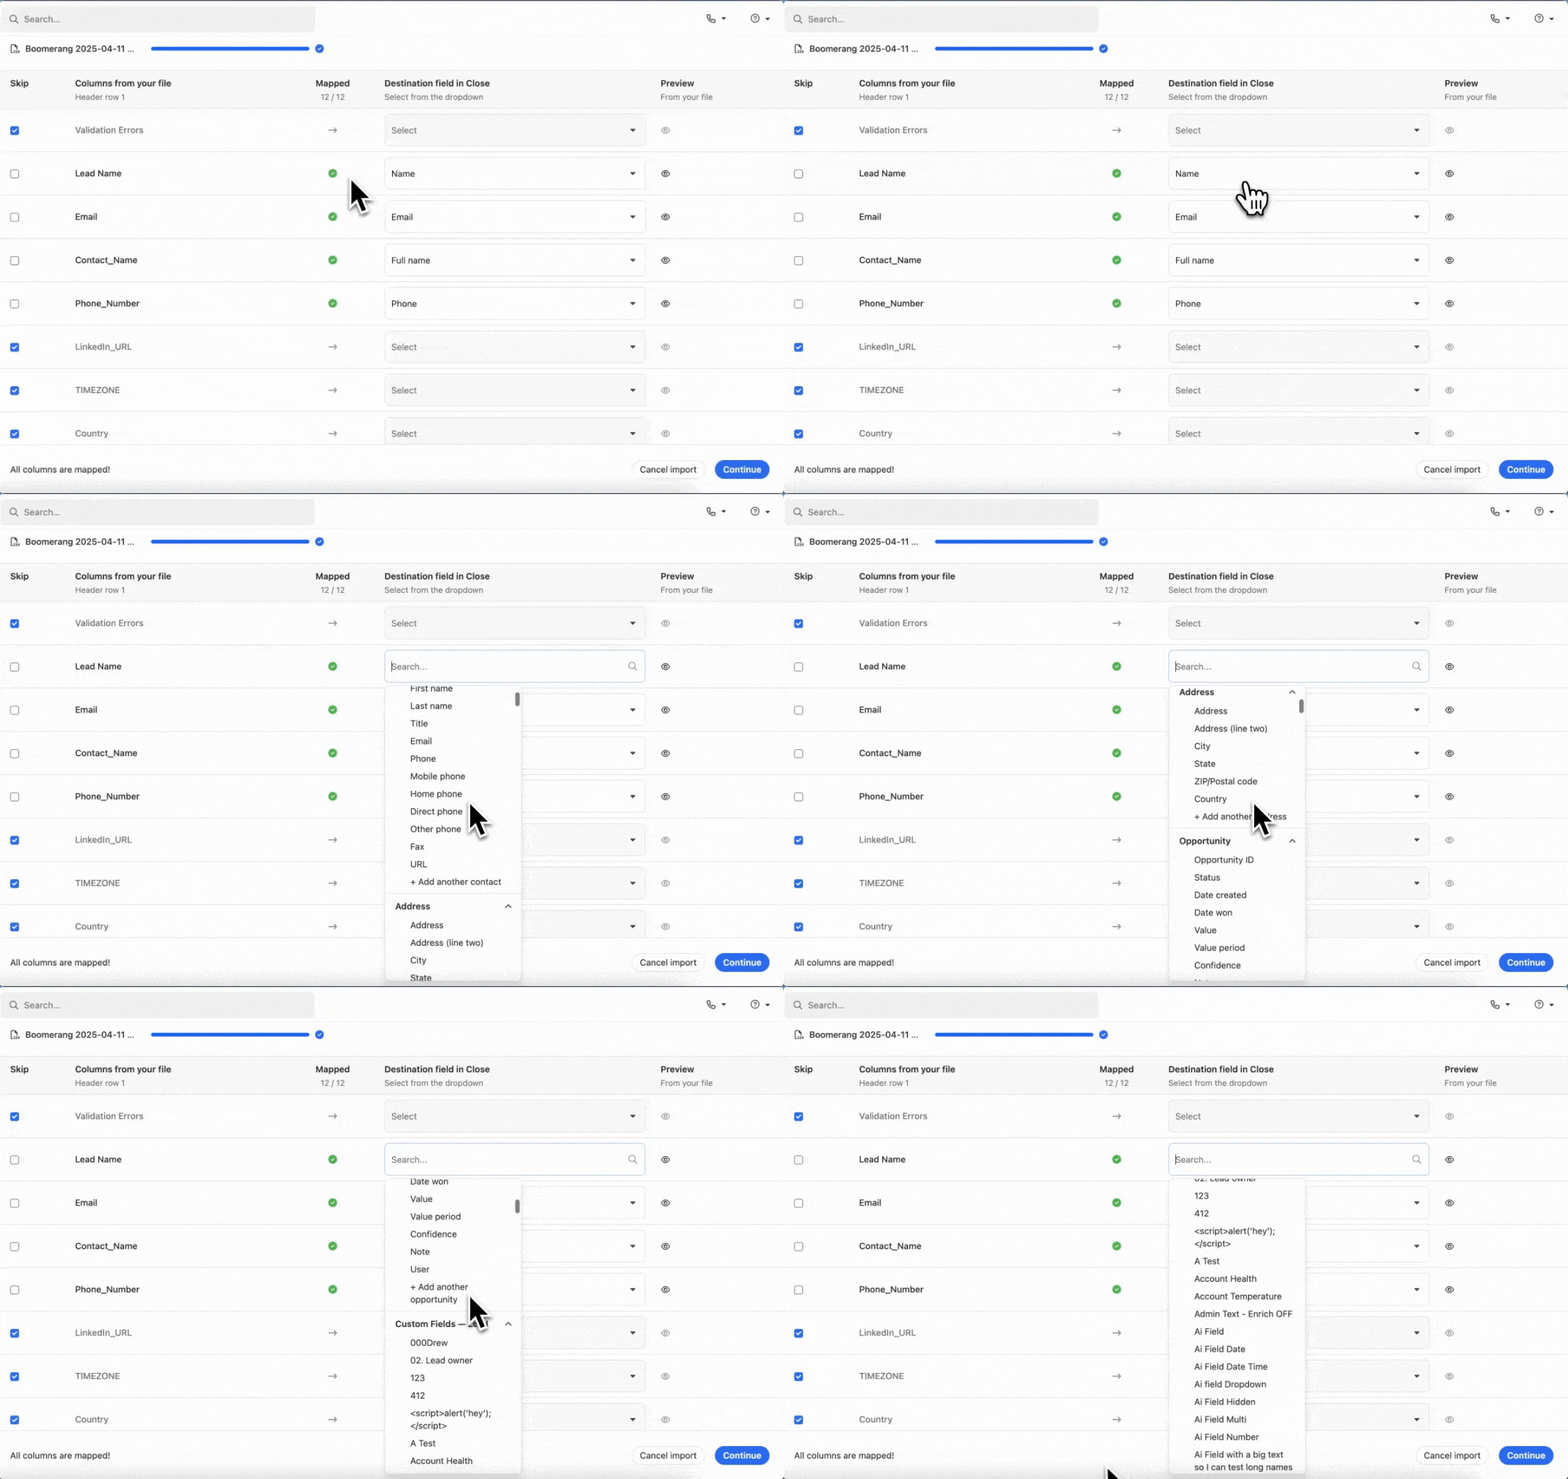
When you start mapping your data, you will see the Close Standard Field options under the categories Lead, Contact, and Address (pictured below). Close’s phone and email functionality rely on these Standard Fields being filled out, so be sure you do not create duplicate Custom Fields for fields that are already built-in.

Don’t see the field you need? You can manually create a Custom Field or you can create a Custom Field upon import.
Custom Fields
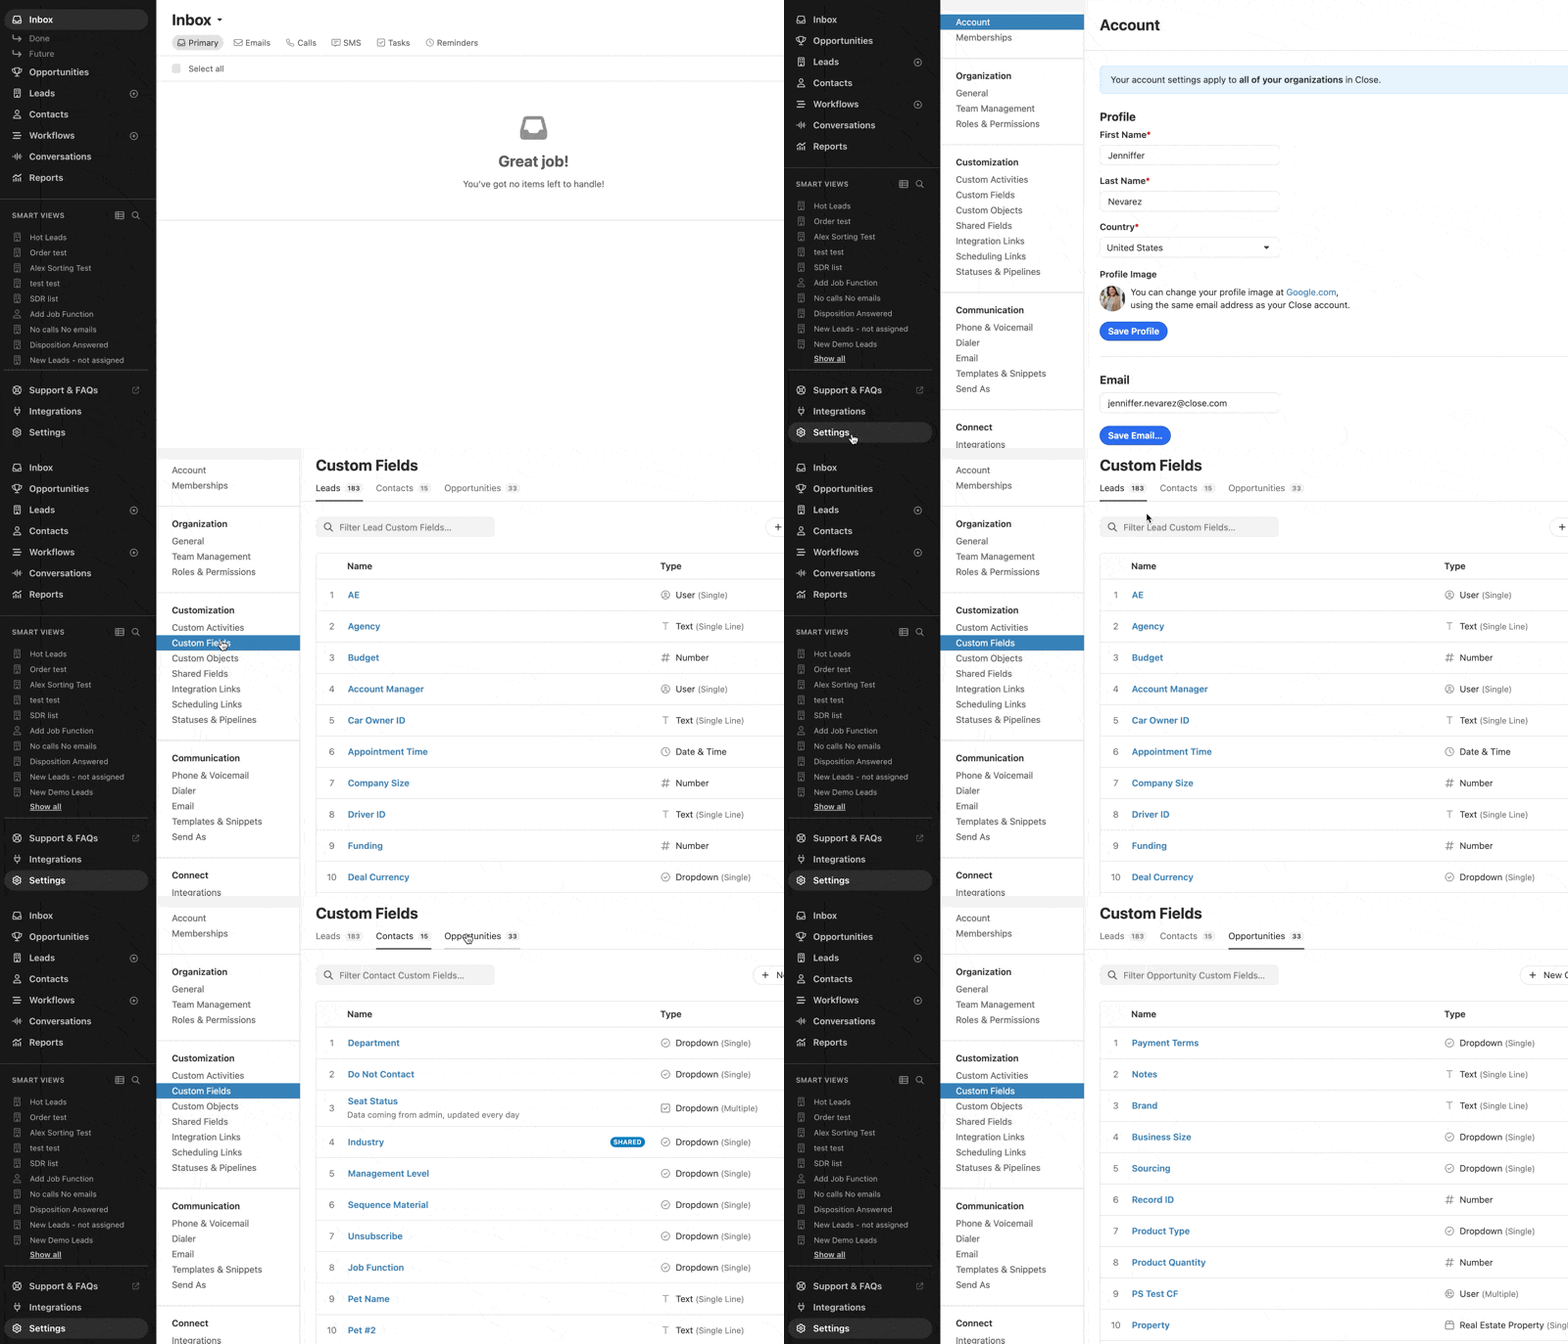
These can be created manually under the categories of Lead, Contact, or Opportunity by navigating to Settings → Click the Custom Fields page within Close.

Keep in mind that you can also create a Custom Field upon import. When importing a list of leads, Close will anticipate which Custom Fields you might want to create and mark those as New. Mapping to a field marked New will create a new Custom Field within Close.
TIP
A common mistake is creating multiple Custom Fields for identical data points. This will lead to confusion over the correct custom field to keep updated.
Mistake Example: On first data import - New Custom field titled - Employee Size
On second data import - New Custom Field titled - Employees
To avoid this, create consistency with your imports! Before creating a “New” field, double-check our Standard Field options AND your previously created custom fields to make sure there isn’t a pre-existing place for that data to live.
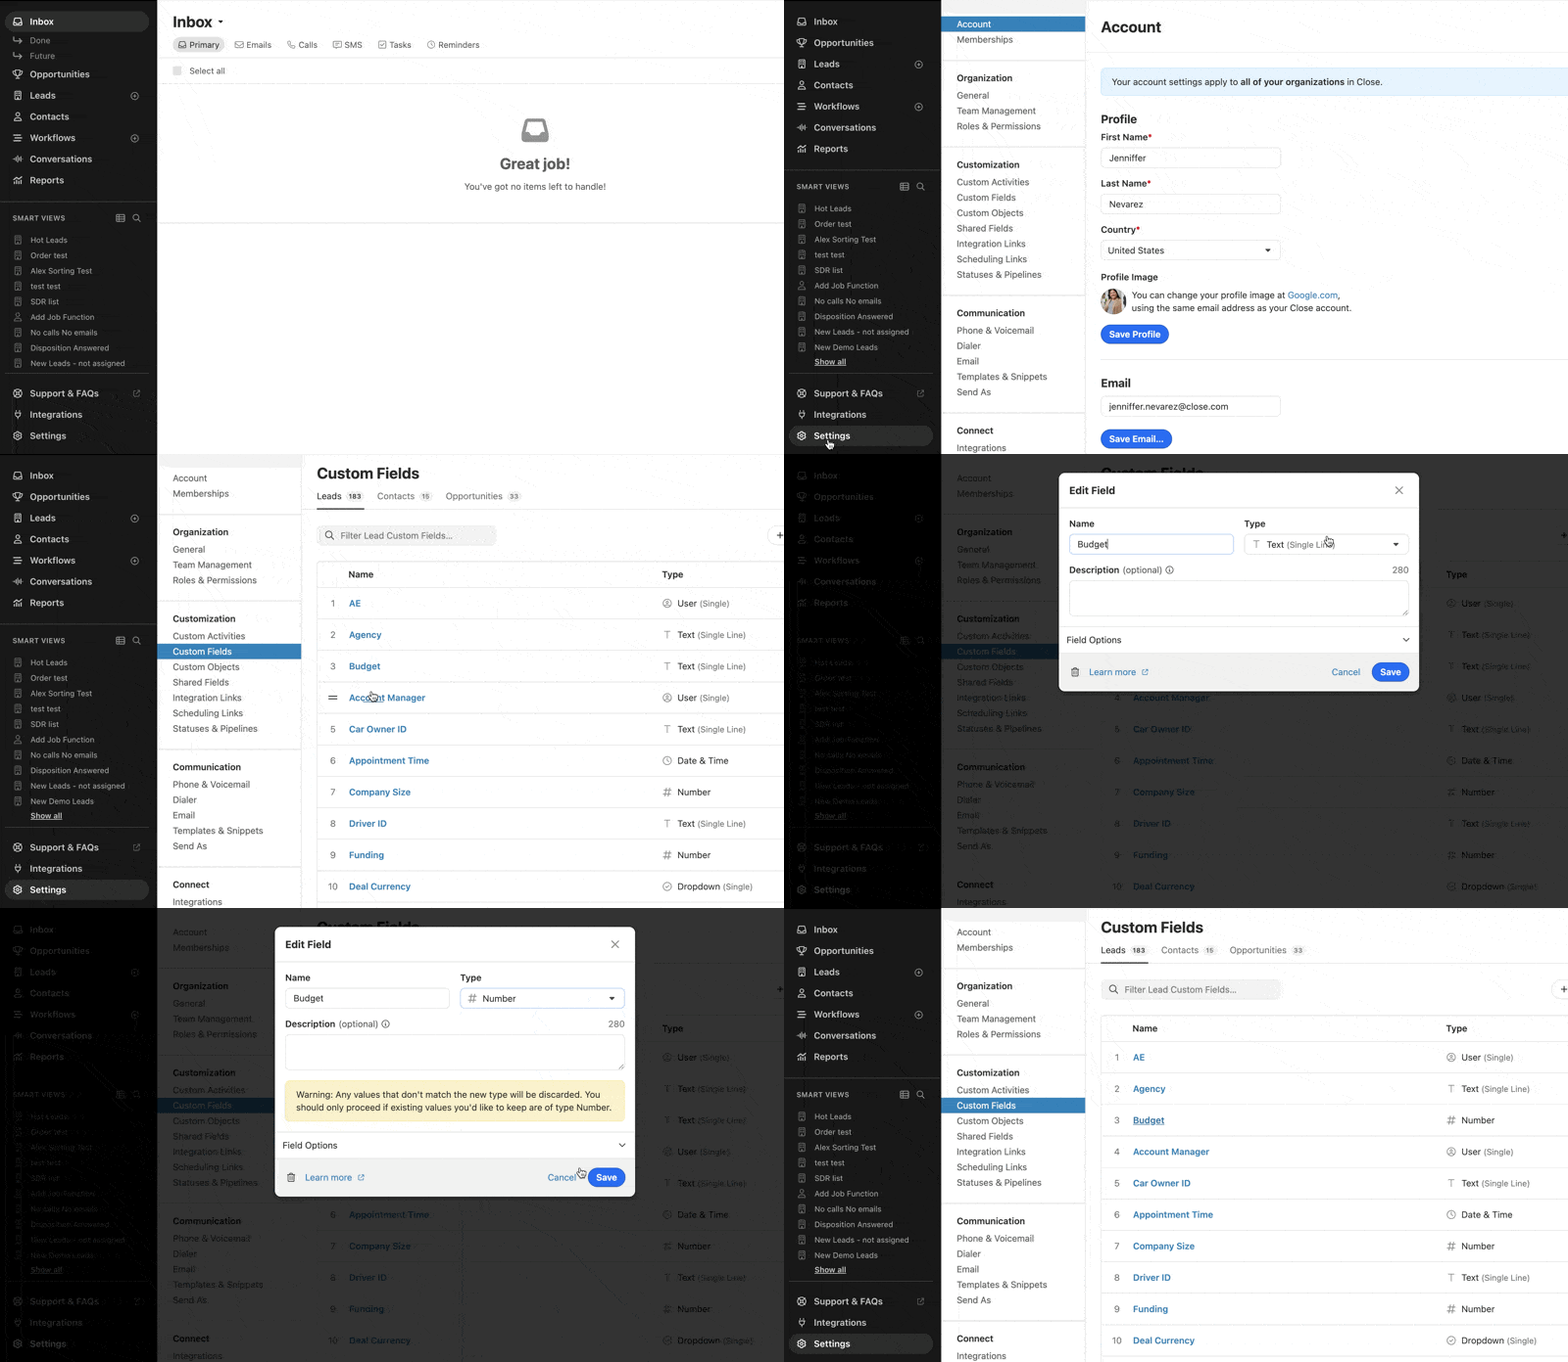
When you create a new Custom Field on import, Close will default that field to a “text” type. You can change this after you import the data, as long as everything in the field you imported matches your desired data type (more about Data Types below).
To do this, go to your Close account → Click Settings → Click Custom Fields → Click on the New Custom Field you created on import → Click the type dropdown and select the desired option.

Keep in mind that the best practice would be to preemptively create those Custom Fields in Close (Settings > Custom Fields) selecting the types that will best conform to the data you will bring in.
Switching Your Field Type
If you are switching to a number field type: Close will delete the field for any value that has text or symbols in it. Be sure to import ONLY numeric values.
If you are switching to a choice field type (single, or multiple): Close will automatically create choices for every unique answer in the field that you have uploaded. Be careful of typos within your file, as Close will create an option for every version of the same value.
2. Decide which Data Type is Needed
The second step in your data cleaning and mapping process is to decide what Data Type you need in each field. It is important to have your data in the correct Type so that you can take advantage of our searching features.
For example: if you have Employee Size in a number field, you will be able to search Leads within a range. E.g., “Show companies that have more than 100 employees“. However, if you make Employee Size a text field you will only be able to search for exact matches like, “show me companies that have exactly 103 employees”.
We’ve highlighted the requirements for all data types below.
Number: a field that only accepts numeric values (including numbers with decimal places). Importing a column with any symbols or letters will result in errors.
Text: a plain text field with no validation or structure.
Date: a text field that only accepts a date. We recommend writing dates numerically to avoid any typos but any of the following formats will work: 07/11/1991; July 11th, 1991; 07.11.1991.
Date & Time: a field that requires both a date and a time.
Choices (single): a dropdown of predefined choices where you can only select a single choice on a single Lead. To avoid errors double check that the choices in your file match exactly to the choices you have built in Close. If creating a new field upon import then you can use your files choices to create the list of choices in Close.
Choices (multiple): a dropdown of predefined choices where you can select one or more choices on a single Lead. To avoid errors double check that the choices in your file match exactly to the choices you have built in Close. If creating a new field upon import then you can use your files choices to create the list of choices in Close.
Contact (single): a dropdown containing all Contacts on a given Lead. You can assign a single Contact to a given Lead. The text in your files field must match exactly to an existing Contact in Close.
Contact (multiple): a dropdown containing all Contacts on a given Lead. You can assign one or more Contacts to a given Lead. The text in your files field must match exactly to an existing Contact in Close.
User (single) : a dropdown containing all the Users who are active in your Close organization. You can only assign a single User to a single Lead. Be sure to match the User’s Name in your file exactly to their name in Close.
User (multiple): a dropdown containing all the Users who are active in your Close organization. You can only assign multiple Users to a single Lead. Be sure to match the User’s Name in your file exactly to their name in Close.
Hidden (for API use only): a field that is never displayed to the users in Close, but can be useful for API integrations. Accepts any data type from JSON, including lists and objects.
3. Common Mistakes to Avoid Before Importing
There are lots of common mistakes in data files that can make importing more difficult. Take a look at your file before you import and see if any of these mistakes can be cleaned up!
Remove Unnecessary Fields: Before importing your file, delete any column of data that you don’t need in Close. Importing larger than necessary files creates unnecessary “bloat” and confusion in Close.
Match The Data In Your Column To Your Desired Data Type: If the data in your file doesn’t match the Data Type requirements exactly, then you may receive errors in importing.
For example: number fields will reject most symbols and all text.
Annual Sales - number field
100000 - ✅ Correct!
$100,000 - ✅ Correct!
One Hundred Thousand - ✖ WRONG!
100000 To 500000 - ✖ WRONG!
Add Phone Number Country Code: If you don’t add the prefix of a country code, Close will default to add a prefix based on your localization settings. To avoid mistakes be sure your phone numbers include the country code prefix.
For example: +1 545-222-2222
Match Text Exactly For Any Choice Field: If you are importing to an existing field with the Data Type of Single Choice or Multiple Choice, then the column text in your file must match the choices text in Close exactly. Typos and misplaced periods are common sources of errors while importing.
Lead Status: The Lead Status field is a Single Choice field. Like the above, the text must match the choices exactly.
Mapping to a lead_id: The lead_id is a field created by Close. You should only map to a lead_id field if you are updating an existing Close lead; otherwise, your import will fail.
Map Phone and Email to the Close Standard Fields: In order to use Close’s built-in calling, emailing, and SMS functionality you must map all email and phone data to the Contact Standard Field options. Close’s built-in communication will NOT function when this data is mapped to a Custom Field.
For any specific questions on the best ways to import your data, please contact our Support team at support@close.com.